


Introduction
Welcome to the idloom “Tax & VAT Rules” user guide. This guide is designed to help event organizers and financial administrators navigate the setup and management of Tax & VAT rules within the idloom platform. By following this guide, you will learn how to create, manage, and customize Tax rules, ensuring compliance and accuracy in your financial reporting.
Additionally, we will explore the automatic tax calculation feature, which simplifies the process by determining the correct taxes based on event location, type, and the countries of both the organizer and attendees.
Let’s get started!
Advantages of the Tax & VAT Rules Module for Event Organizers
- Automatic Tax Calculation: Simplifies tax management by automatically calculating VAT, HST, or GST based on event details and participant locations.
- Compliance Assurance: Ensures compliance with local and international tax regulations, reducing the risk of errors and penalties.
- Time Efficiency: Saves time by automating tax computations, allowing organizers to focus on other event tasks.
- Accuracy: Minimizes human error in tax calculations, ensuring accurate financial records and reporting.
- Customization: Offers flexibility to set specific tax rules tailored to different types of events and items sold.
Getting started
In the idloom invoice module, you can set up Tax & VAT rule sets to apply to your event registrations. A VAT rule is a set of conditions that determine the applicable tax rate based on event location, type, and the countries of both the organizer and attendees. For example, if a registrant has a valid EU VAT number, the tax rate might be 18%; if another is from outside the EU, the rate could be 0%.
To start with Tax & VAT rules:
- Create a Journal: This acts as the container for your receipts or invoices.
- Create Tax & VAT Rules: Depending on the type of items sold, you may need different VAT rules for a single event.
- Set Tax Rate Conditions: Define the conditions under which each tax rate applies.
- Apply them to an event or to registration items.
Working with VAT rules
Navigate to the Tax and VAT rules section of the Invoice Module.
- Click on the “Create VAT rule” button.
- Fill in the fields:
-
Name: Mandatory. Provide a clear name, e.g., “Onsite events Italy 22%”.
-
Tax label: Mandatory. Specify the tax name, e.g., “VAT”, “HST”, “GST”.
-
Description: Optional, for personal reference.
-
Journals: Mandatory. Link your VAT rule to one or multiple journals. The registration form is linked to one journal, allowing selection of Tax & VAT rules from that journal only.
-
- Click on the “Save” button.
Tax rates and conditions
You can build the list of conditions and applicable tax rate to apply to your registrations. The conditions are evaluated in their list order. If the condition is met, the tax rate is applied, if not the next one is evaluated. If no condition is met, no tax will be applied.
You can drag and drop the conditions to change their order based on your requirements.
Click on “+ Add condition” and define your first rule.
- Has a tax/VAT number? Does your registrant set a Tax or VAT number in the registration form and does it affect the tax rate? If not, leave “Indifferent”.
- To evaluate: What field from the registration form do you want to evaluate?
- <empty>: nothing is evaluated and the condition is met every time.
- Country of attendee: as set in the registration form.
- State of attendee: as set in the registration form
- Tax/VAT number: Leading country code of the Tax/VAT number.
- Tax/VAT number and country of the attendee.
- Condition: the value that will be evaluated based on your preceding choice
- Rate: the tax/VAT rate to apply if the conditions are met
- Text to be inserted on the invoice: the specific text that will be displayed next to the tax on the receipt, proforma or invoices.
Please note that several conditions might be true for one single registration. In that case, only the first condition met will be applied.
Use Tax & VAT rules in you event registration process
Once you have created your Tax & VAT Rules and set their conditions, you can apply them to an Event or directly to Items (Categories or Options).
To summarize: One or several Tax & VAT Rules can be linked to a Journal. This Journal is then associated with an Event, allowing you to use the Tax & VAT Rules within your event.

Associate an Event to a Journal :
- In your event, navigate to Money > Settings.
- Select the desired Journal from the list.
Select a default Tax & VAT rule for all event items :
- Activate the Tax/VAT section
- Name the tax and select the Default Tax & VAT rule for the event.
The selected rule now applies to the entire event, and you can view an overview of your conditions below the “Default VAT Rule” field.
Set specific Tax & VAT rules to Items
Do you need to apply various VAT Rules on certain Items?
- Activate the “specific Taxes/VATs for categories and options” toggle.
- Click on the "Save" button.
- Navigate to Tickets > Categories or Tickets > Options.
- Select on the item you would like to apply the VAT Rule on.
- Select your VAT Rule from the “VAT Rule” list.
Your Rule now applies to the Item. Repeat for other Items.
Examples
GST/HST application for Canada
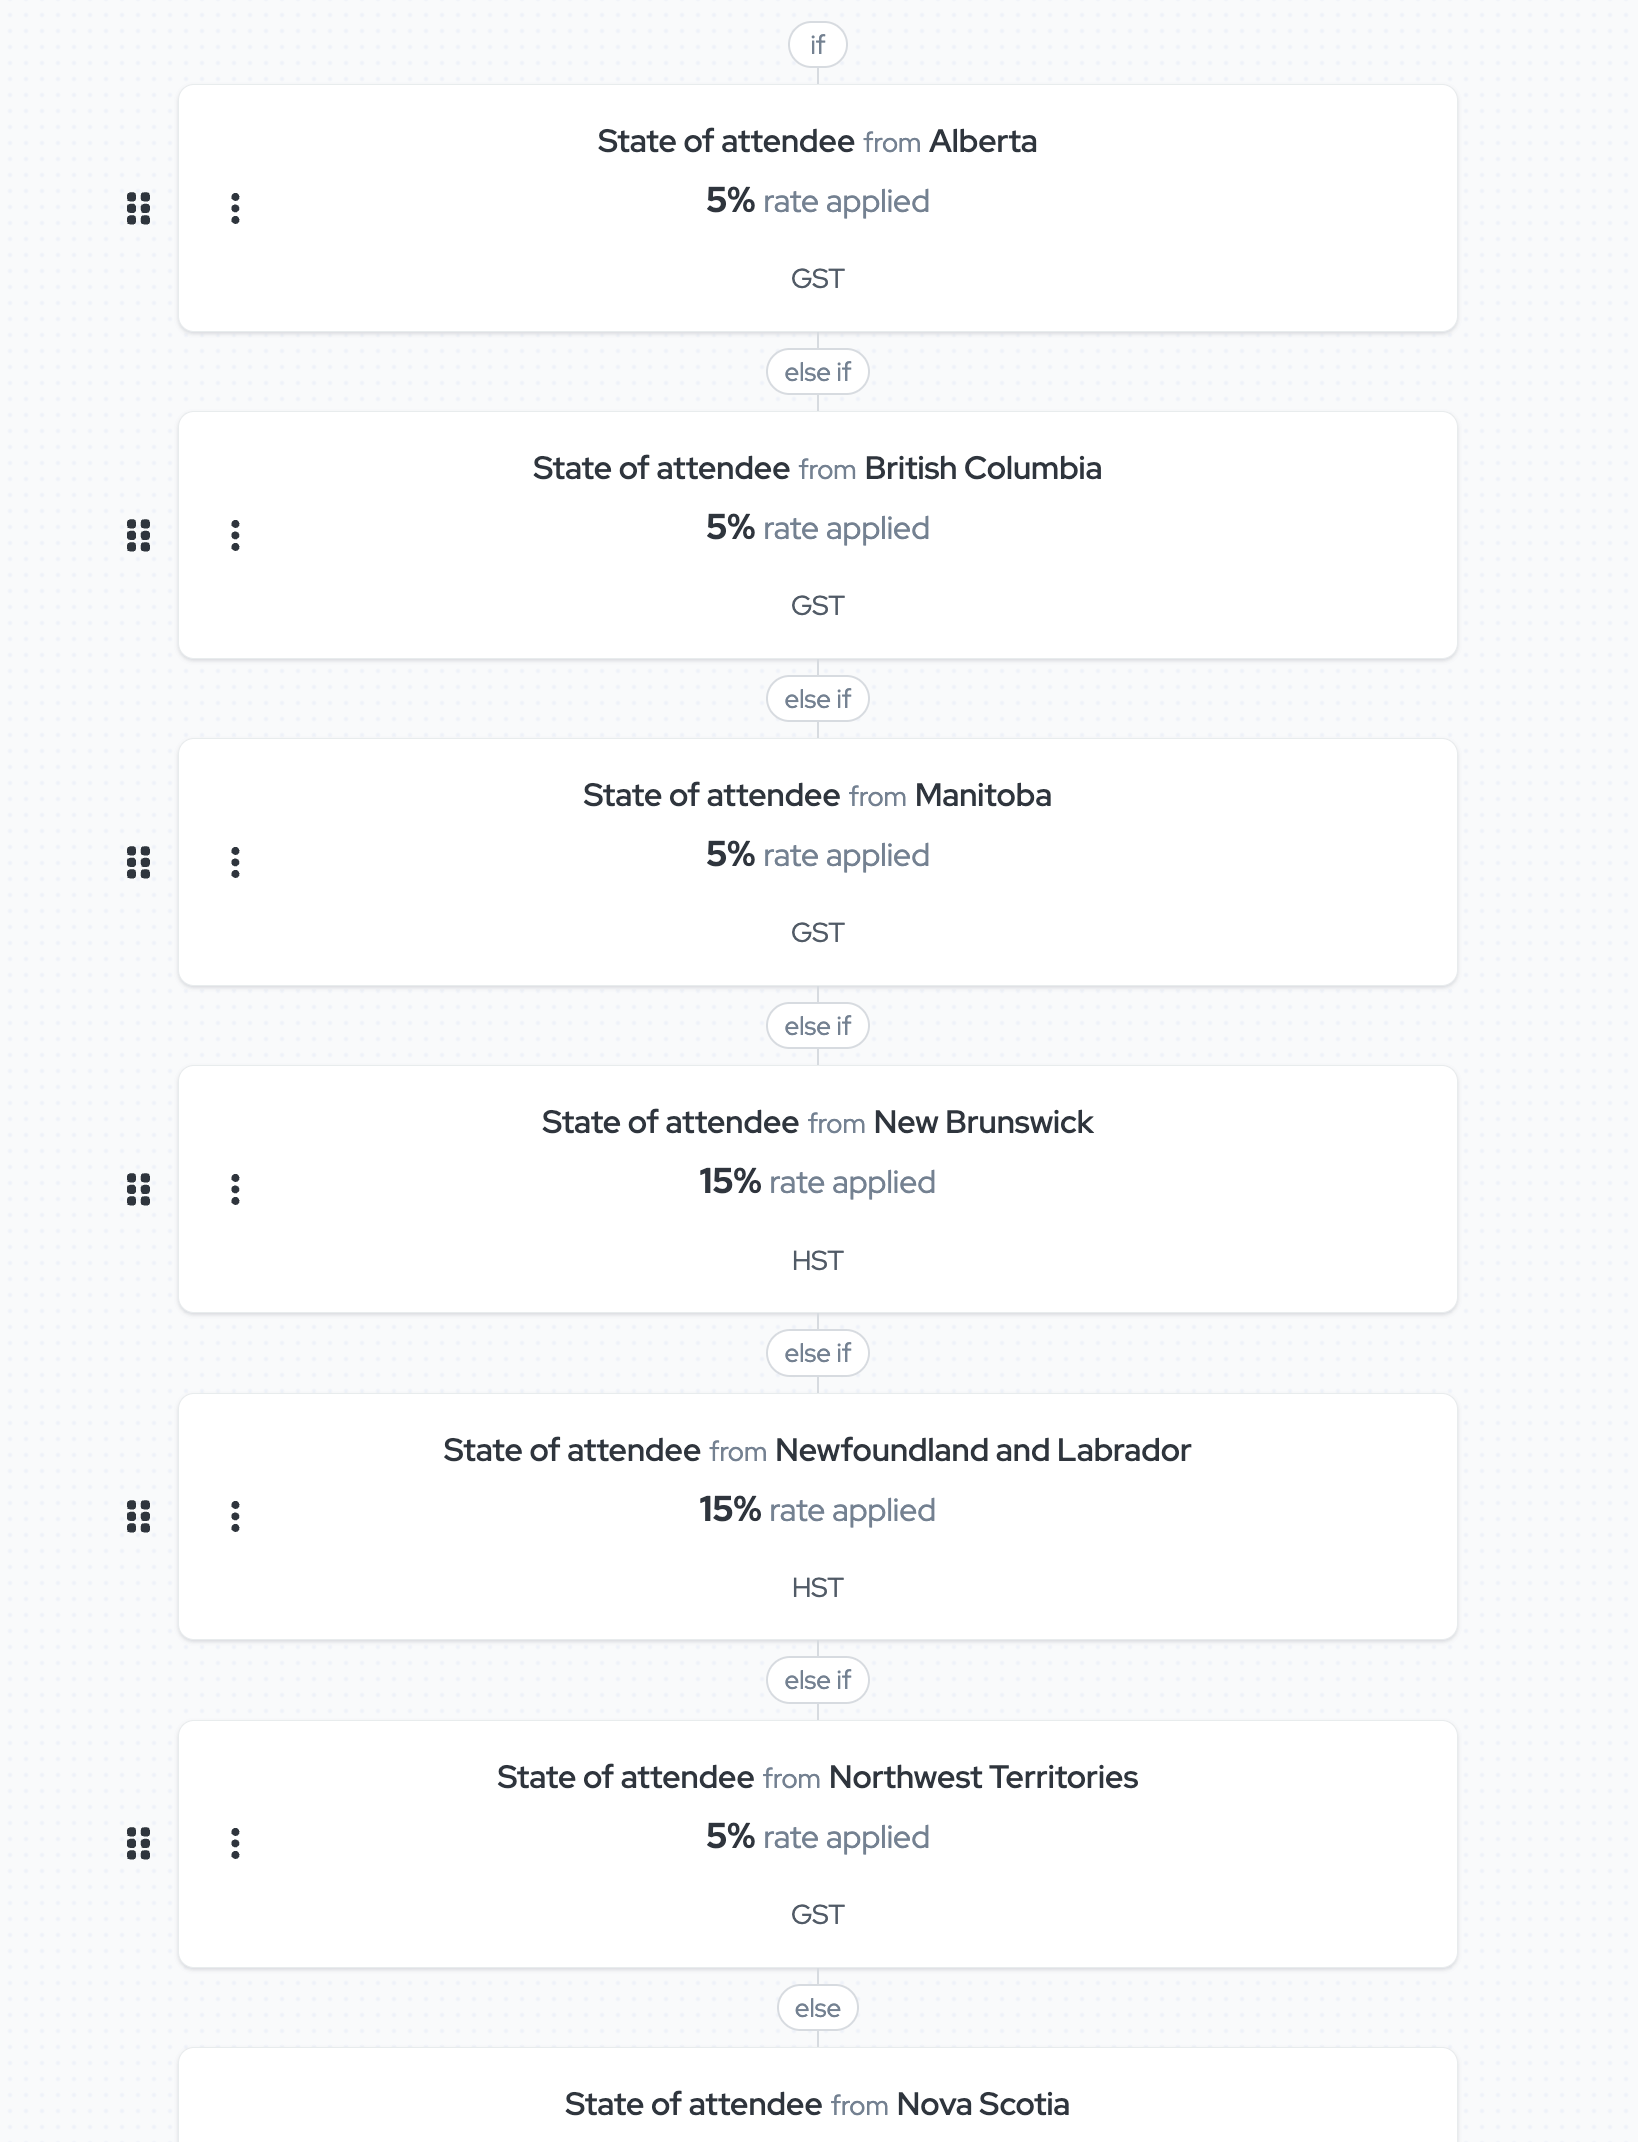
In this example, the application tests the registrant province to set the appropriate tax type and rate. The state field is mandatory and the state list is predefined to make sure at least one condition is met.
VAT application for an online conference (VOD like) in Europe
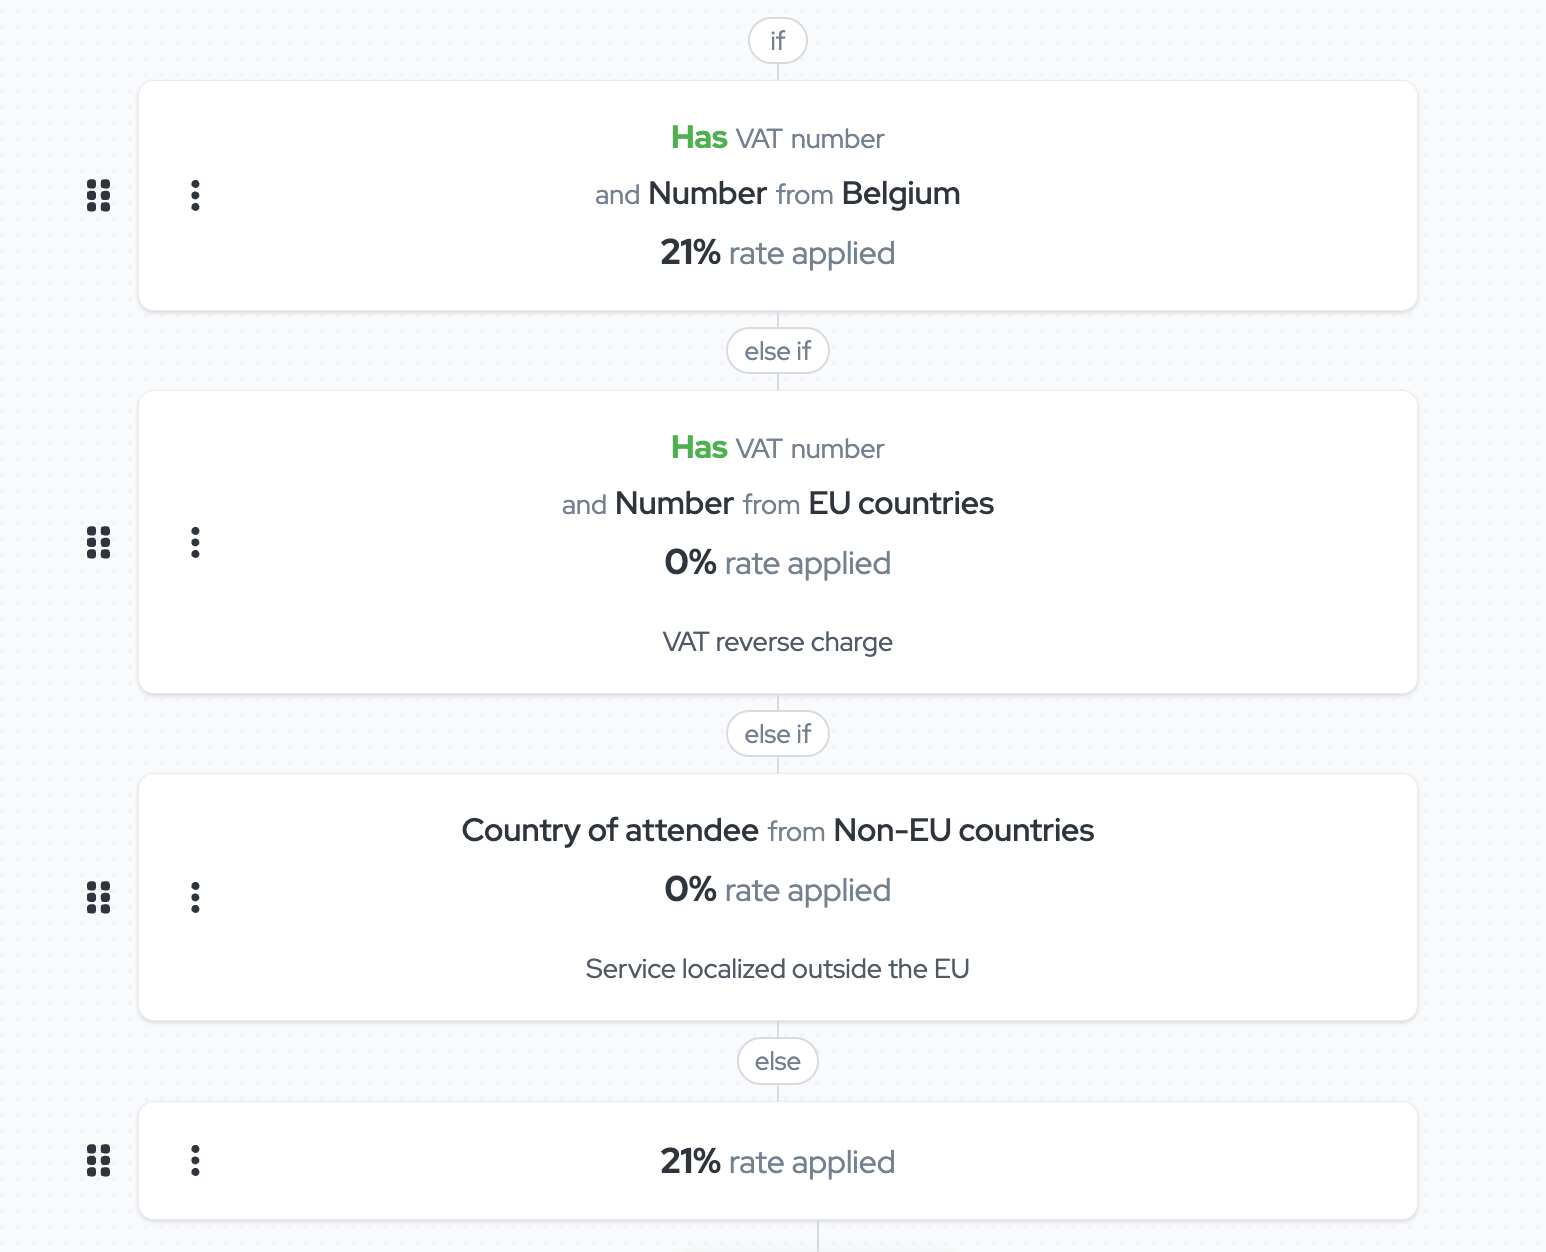
In this example, the organiser is localised in Belgium.
- The application first tests the registrant VAT number to check if it is valid and prefixed with “BE”, and if the condition is met, set the VAT rate to 21% (VAT rate applicable for such services in Belgium).
- If the previous condition is not met, it then tests if the VAT number prefix is one of another EU member country, and if so, applies a 0% VAT rate and mentions “VAT reverse charge” on the invoice or receipt.
- If the previous condition is not met, it then tests if the country of the registrant is outside the EU, and, if the condition is met, sets the VAT rate to 0% and mentions “Service localized outside the EU” on the invoice or receipt
- If none of the conditions were met, it then sets the VAT rate to 21%, which is the default Belgian VAT rate applicable for all EU citizens or organisations without VAT number.
Note that if you don’t set the first condition, the application would set the VAT rate to 0% to all organisations with a VAT number prefixed with “BE”, as Belgium is an EU country.
We wish you a lot of success ruling your VAT Rules with idloom!
The idloom.events team
Frequently Asked Questions
How does the system validate VAT numbers?
The system performs the following checks:
- Pattern Matching: It ensures the VAT number matches the predefined format for the country code.
- VIES Validation: For EU VAT numbers, the system uses the VIES database to confirm if the number is valid and active.
- Non-EU Formats: For non-EU countries, the system checks the VAT number against a predefined pattern for each country.
What Happens If a VAT Number Is Deemed Invalid?
If the VAT number is deemed invalid, the system will treat the registrant as not having a VAT number. It will disregard all “Has a tax/VAT number: Yes” conditions and instead apply the “Has a tax/VAT number: No” conditions. To prevent any VAT calculation discrepancies, we strongly recommend configuring the final condition without any validation checks, specifying the tax/VAT rate to apply if all other conditions fail.