Financial Documents
🔄 Real-Time Financial Insights:
Monitor event finances in real-time. Find your financial documents with ease, ensuring you stay on the path to success.
💳 Streamlined Billing and Payments:
Generate invoices, manage payments, and simplify transactions. No more manual hassle, just smooth financial operations.
📈 Powerful Exporting:
Gain in-depth financial insights with detailed exports. Make data-driven decisions and maximize your event's profitability.
👥 Team Collaboration:
Foster transparency and accountability within your team. Everyone can access the financial documents of your event.
📑 Compliance Made Easy:
Ensure compliance and prepare for audits effortlessly. We've got your back with accessible, organized financial records.
🔒 Security Matters:
Your financial data is secure with us. Rest easy knowing your sensitive information is protected.
Boost your event management game with our integrated financial solutions. Improve efficiency, cut costs, and drive profitability. Get started today with idloom!
1. Where can financial documents be found?
- Attendee Details
- Customer Details
- In the respective Proformas/Invoices /Credit Notes section in the Invoice Module
- In the respective Proformas/Invoices /Credit Notes section in the Events Module
2. Proformas
Based on a Proforma, an Invoice can be created if your Proforma Journal has been linked to an Invoice Journal.
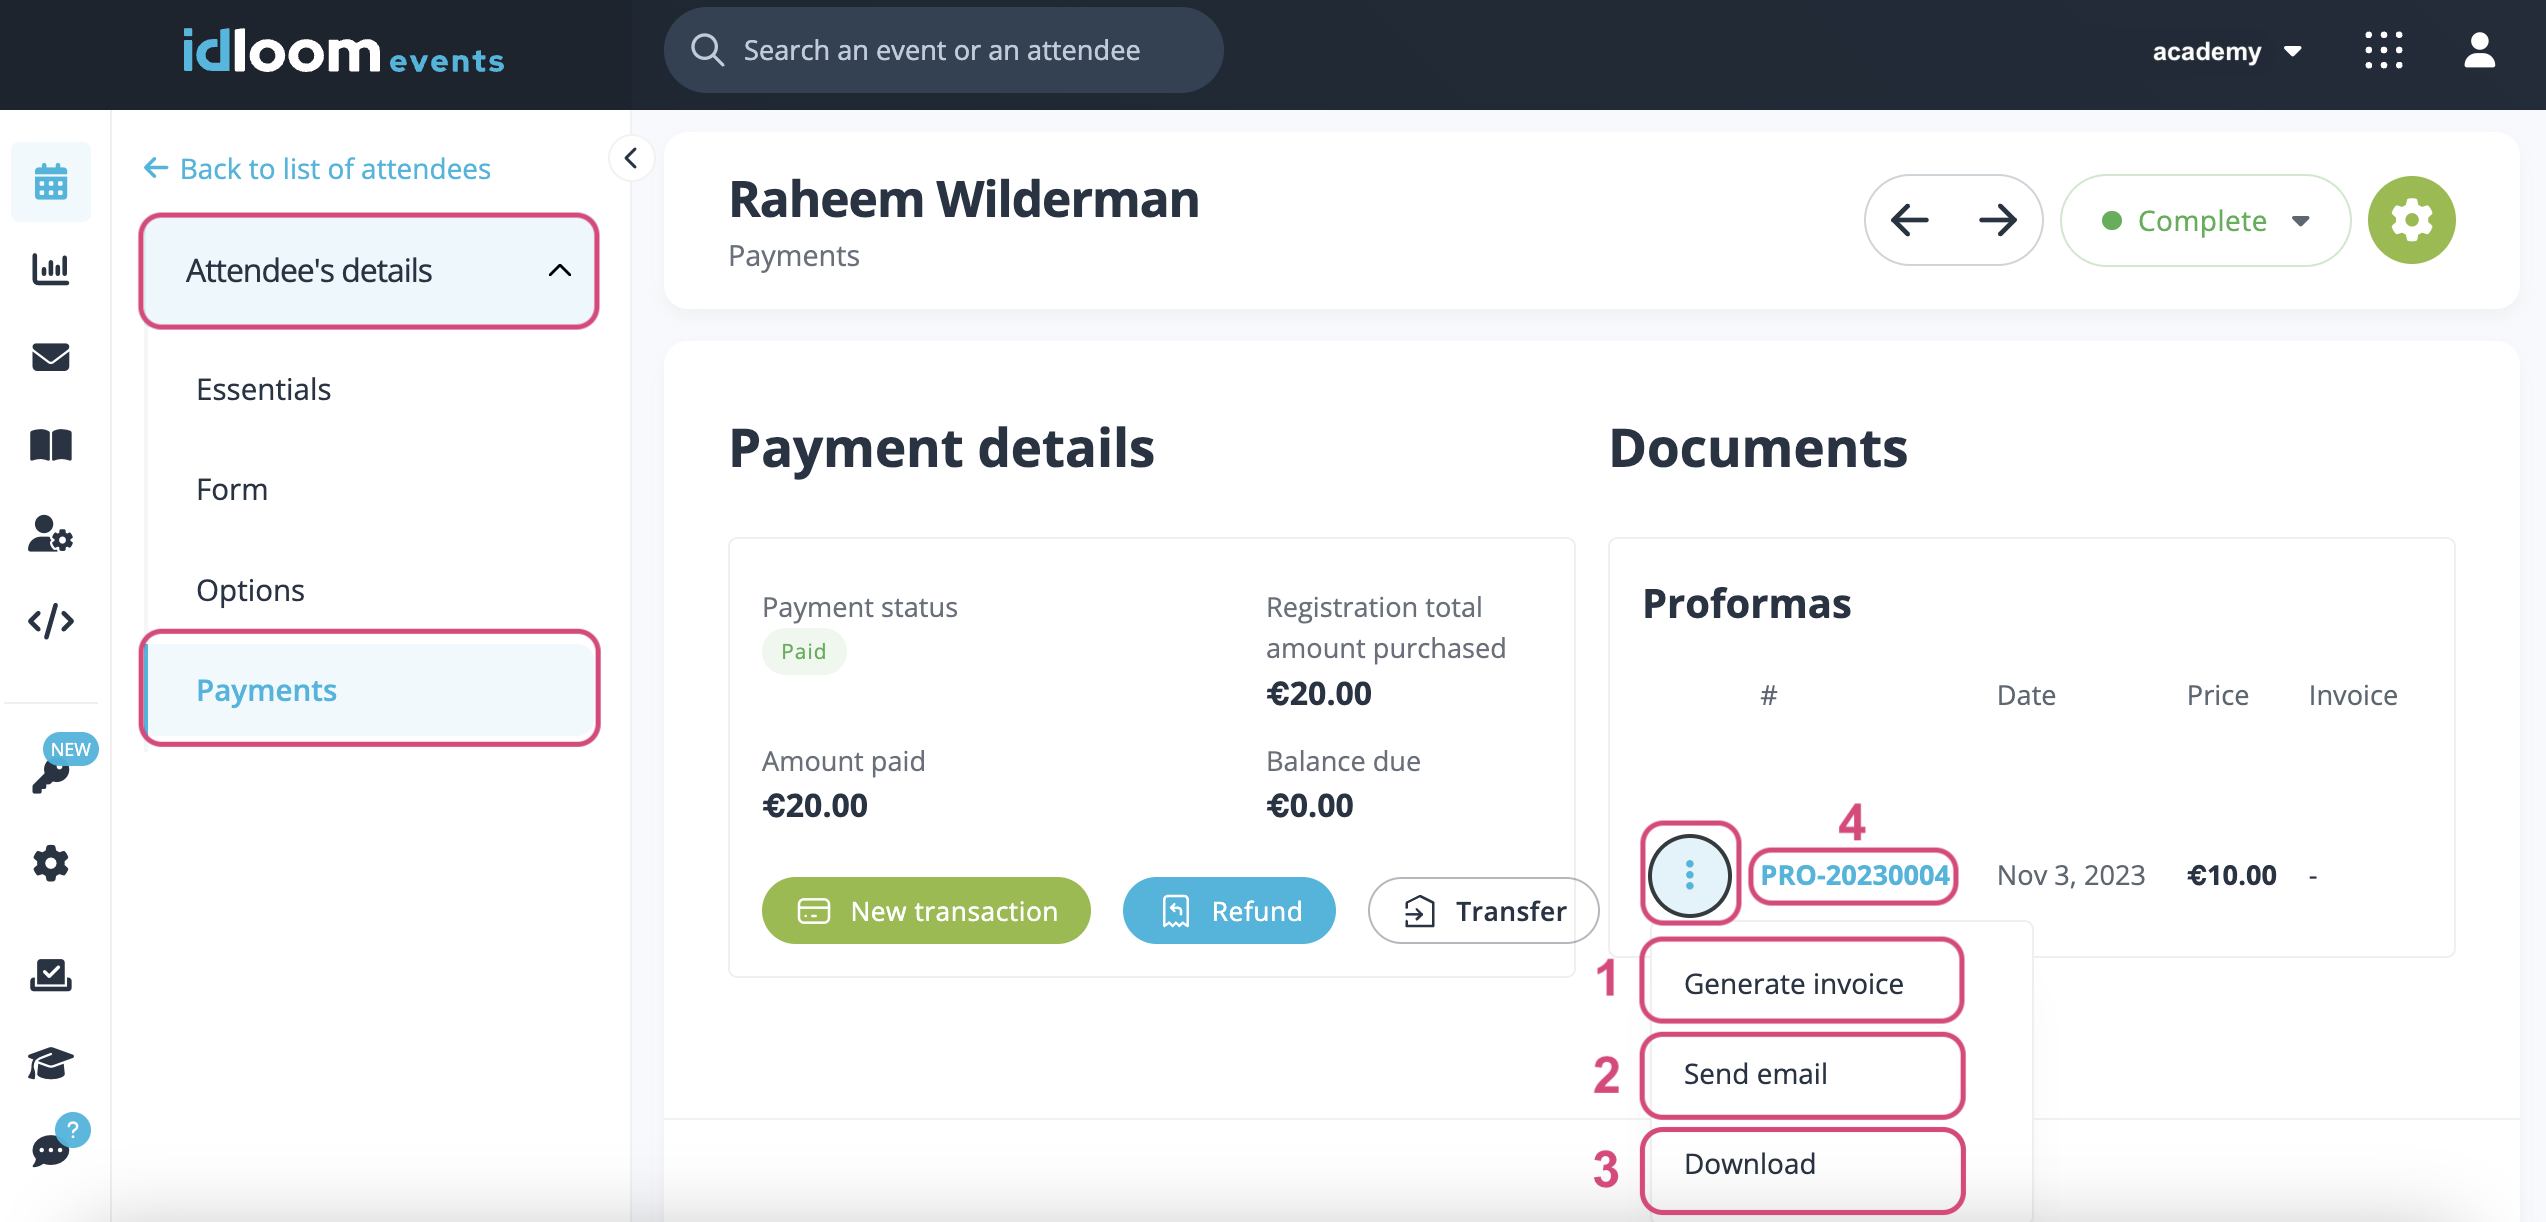
Attendee Details - Events Module
Navigate to the Event > General > Attendees section.
Then, click on the desired Attendee.
The following actions will be available to you from the three-dots menu next to the Proforma:
- Generate an Invoice – based on your Proforma, an invoice will automatically be generated for the same amount.
Note: you can only generate one Invoice per existing Proforma. - Send email – you can send the financial document to the Attendee via email.
- Download – you can download the financial document.
- You can also click on Click on the name of the financial document to view it.
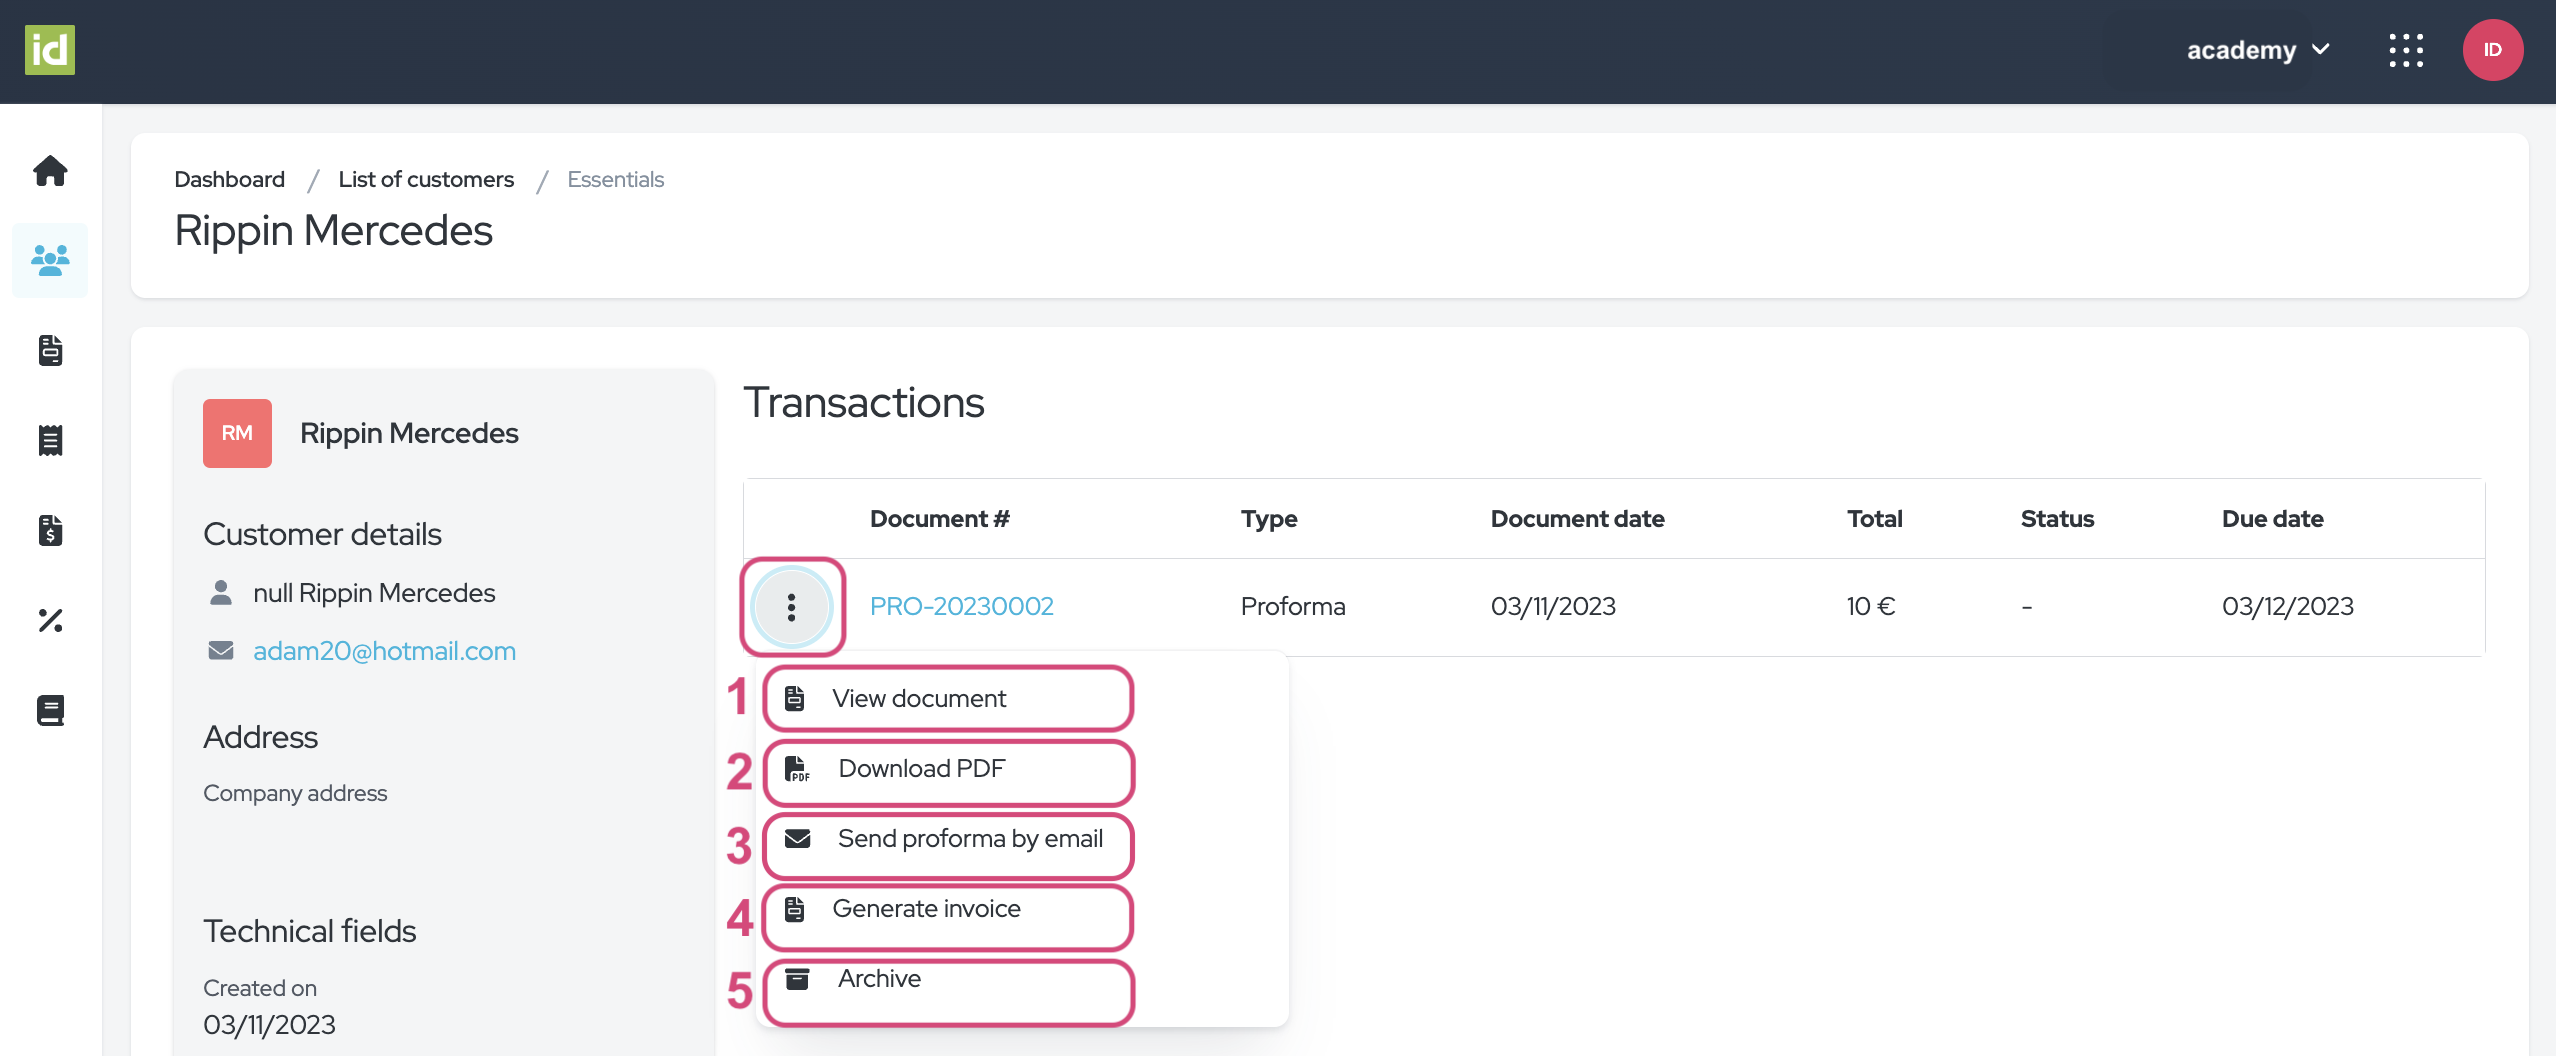
Customer Details - Invoice Module
Navigate to the Invoice Module > Customers section.
Click on the name of the Customers to view their details.
Click on the three-dots menu to:
- View the document
- Convert the Proforma into an Invoice. The amount will be the same on both documents.
- Download the documents as a PDF
- Send the credit note by email to the Customer
- Archive the document (do not forget to click on the red checkmark to confirm)
Note: you will only see active documents in this section. If you click on the document number, you will be redirected to its details.
Proforma section - Invoice Module
Navigate to the Invoice Module > Proforma section.
You can filter your document overview, see the details of a document, or click on the three-dots menu for more actions.
Filter
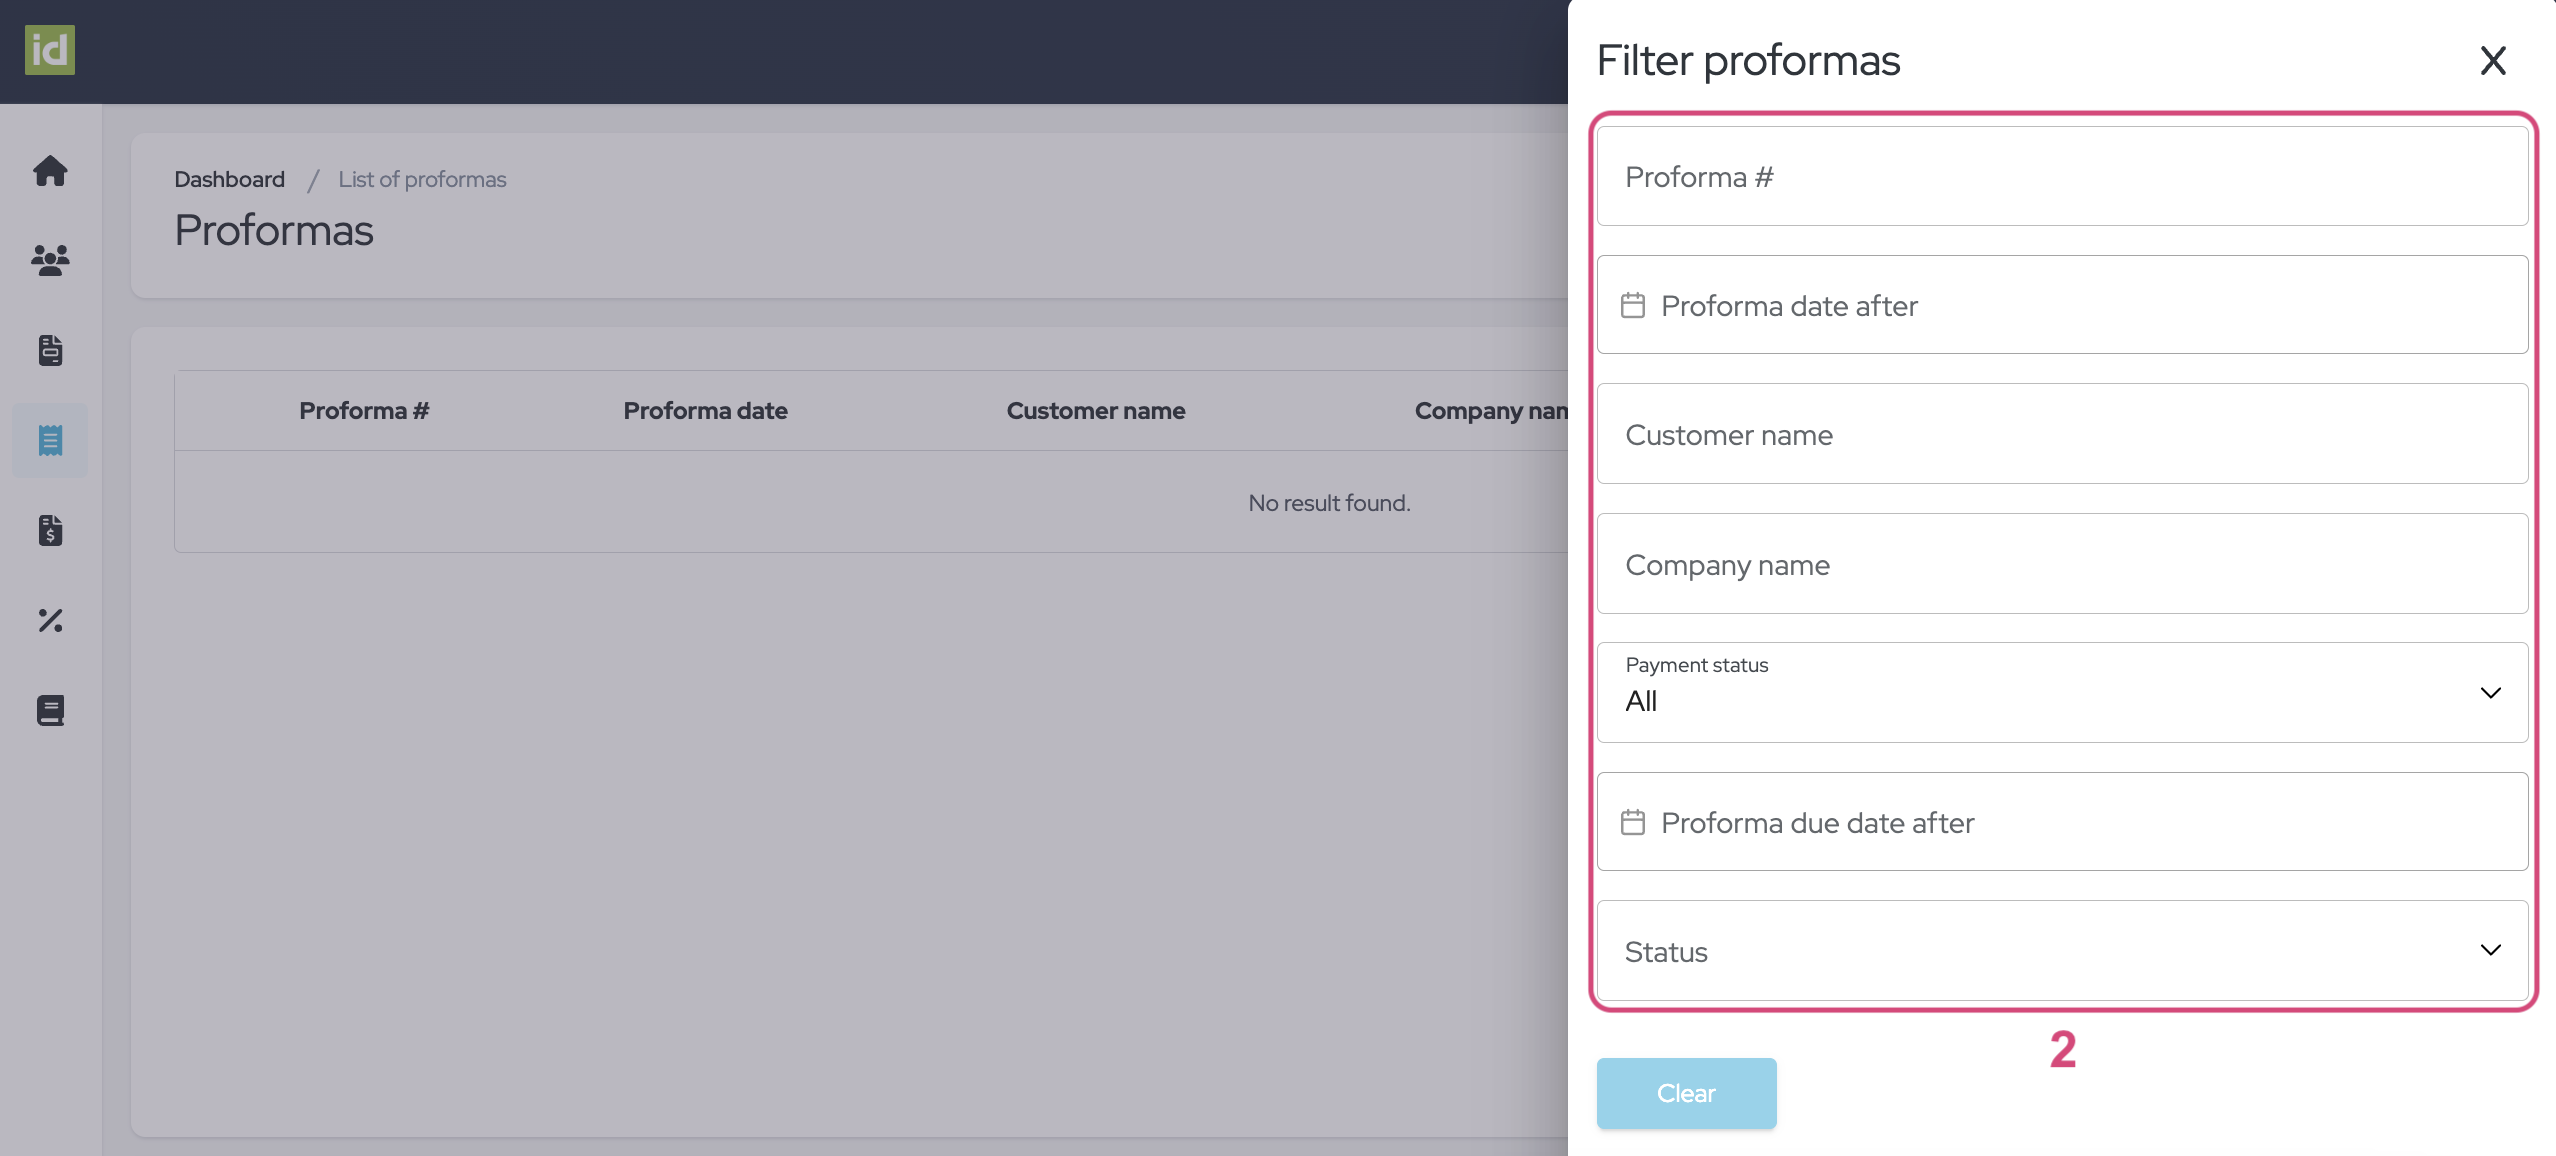
- Click on the “Filter” button.
- Specify what criteria you would like to filter on. You can filter on one or multiple criteria.
- Proforma number - this allows you to filter the number of the Proforma.
- Proforma date after - you can filter all documents issued after a specified date.
- Customer name - this allows you to filter on the name of the Customer linked to the Proforma.
- Company name - this allows you to filter on the name of the Company linked to the Proforma.
- Payment status – this choice list allows you to filter on the payment status of the document: All, Paid, or Not paid.
- Proforma due date after - you can filter all documents issued with a due date after a specified date.
- Status – this choice list allows you to filter the status of the document: Active or Archived.
No need to save, your changes are directly applied.

Remove filters
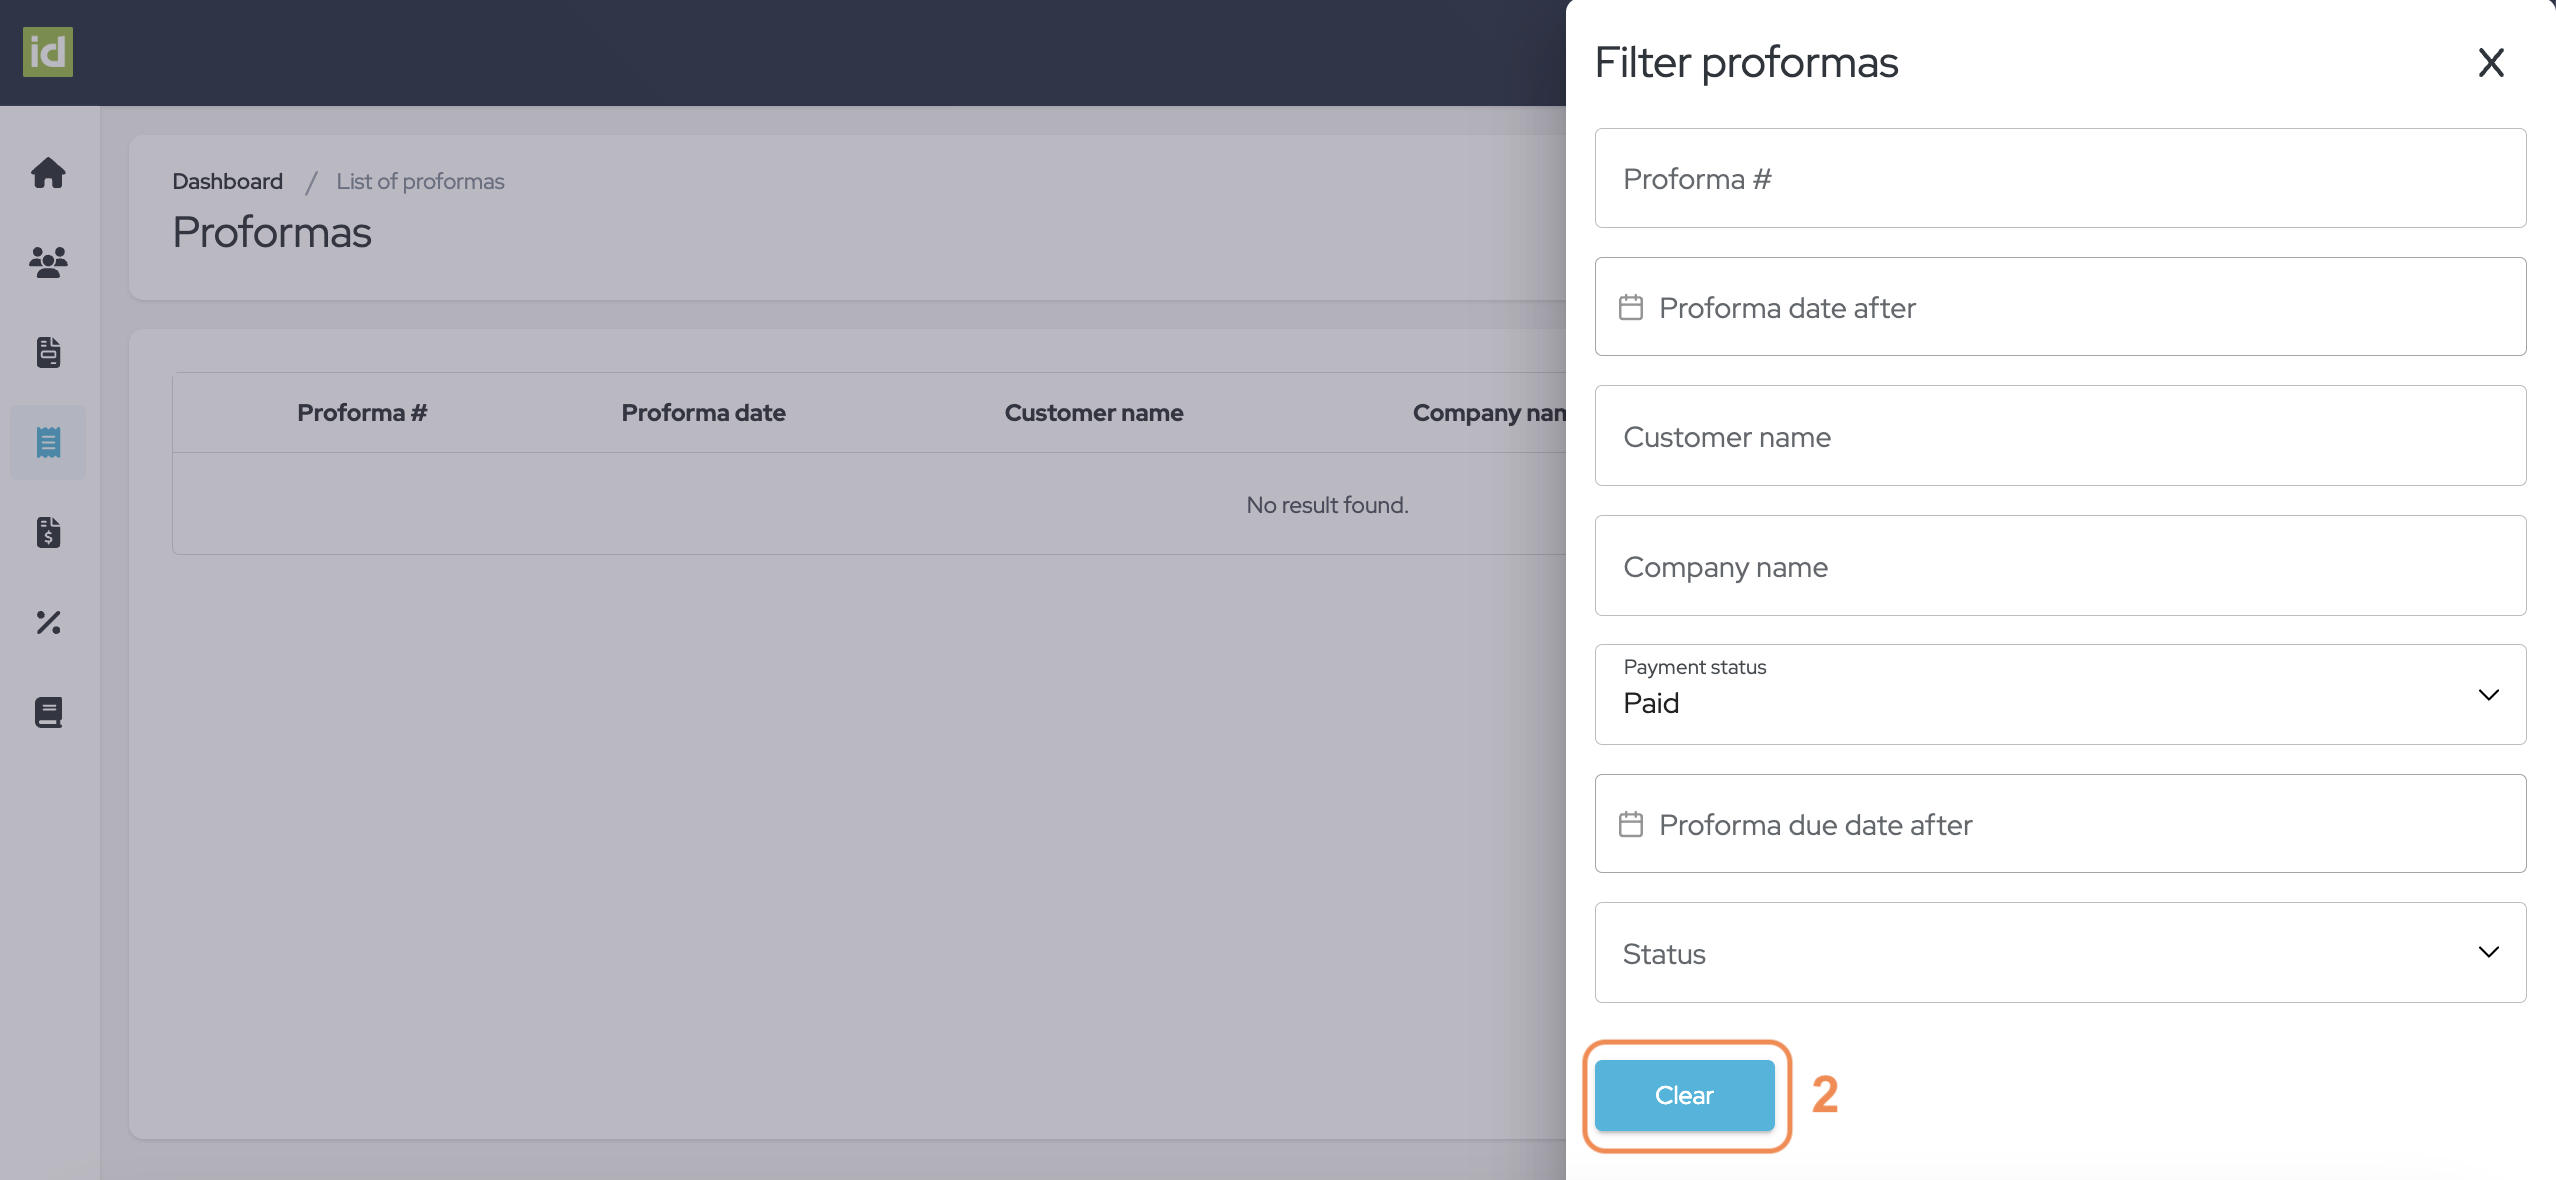
- Click on the cross next to the filter button.
OR
- Click on the “Filter” button.
- Then on the “Clear” button to clear your filters and to display the complete list of Proformas.

Details of a Proforma
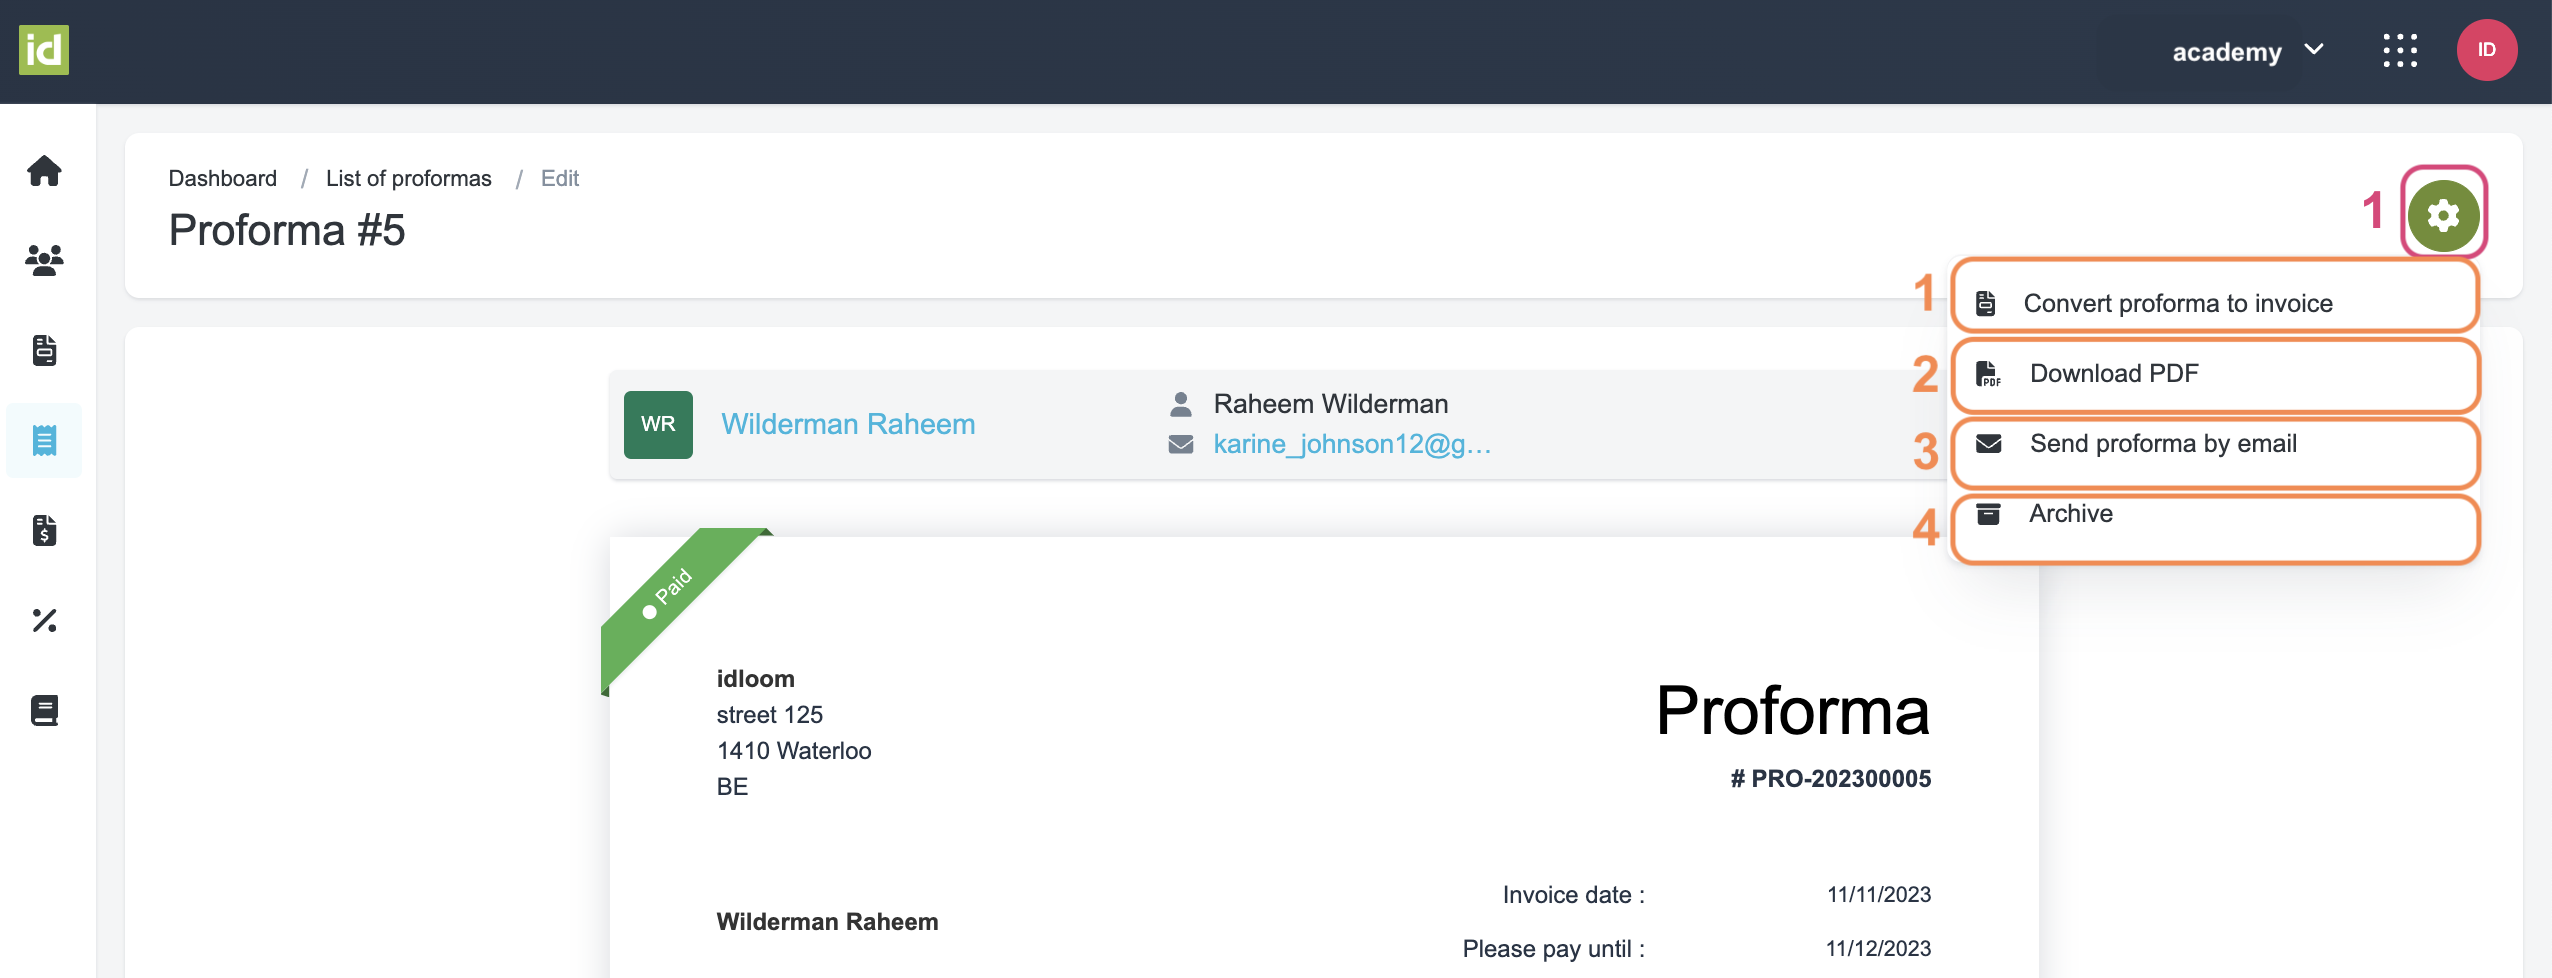
Click on the name of the document to view its details.
- Click on the “More action” button to:
- Convert the Proforma into an Invoice. The amount will be the same on both documents.
- Download the documents as a PDF
- Send the credit note by email to the Customer
- Archive the document (do not forget to click on the red checkmark to confirm).
Note: you can click on the Customer’s name to be redirected to the Customer details section.
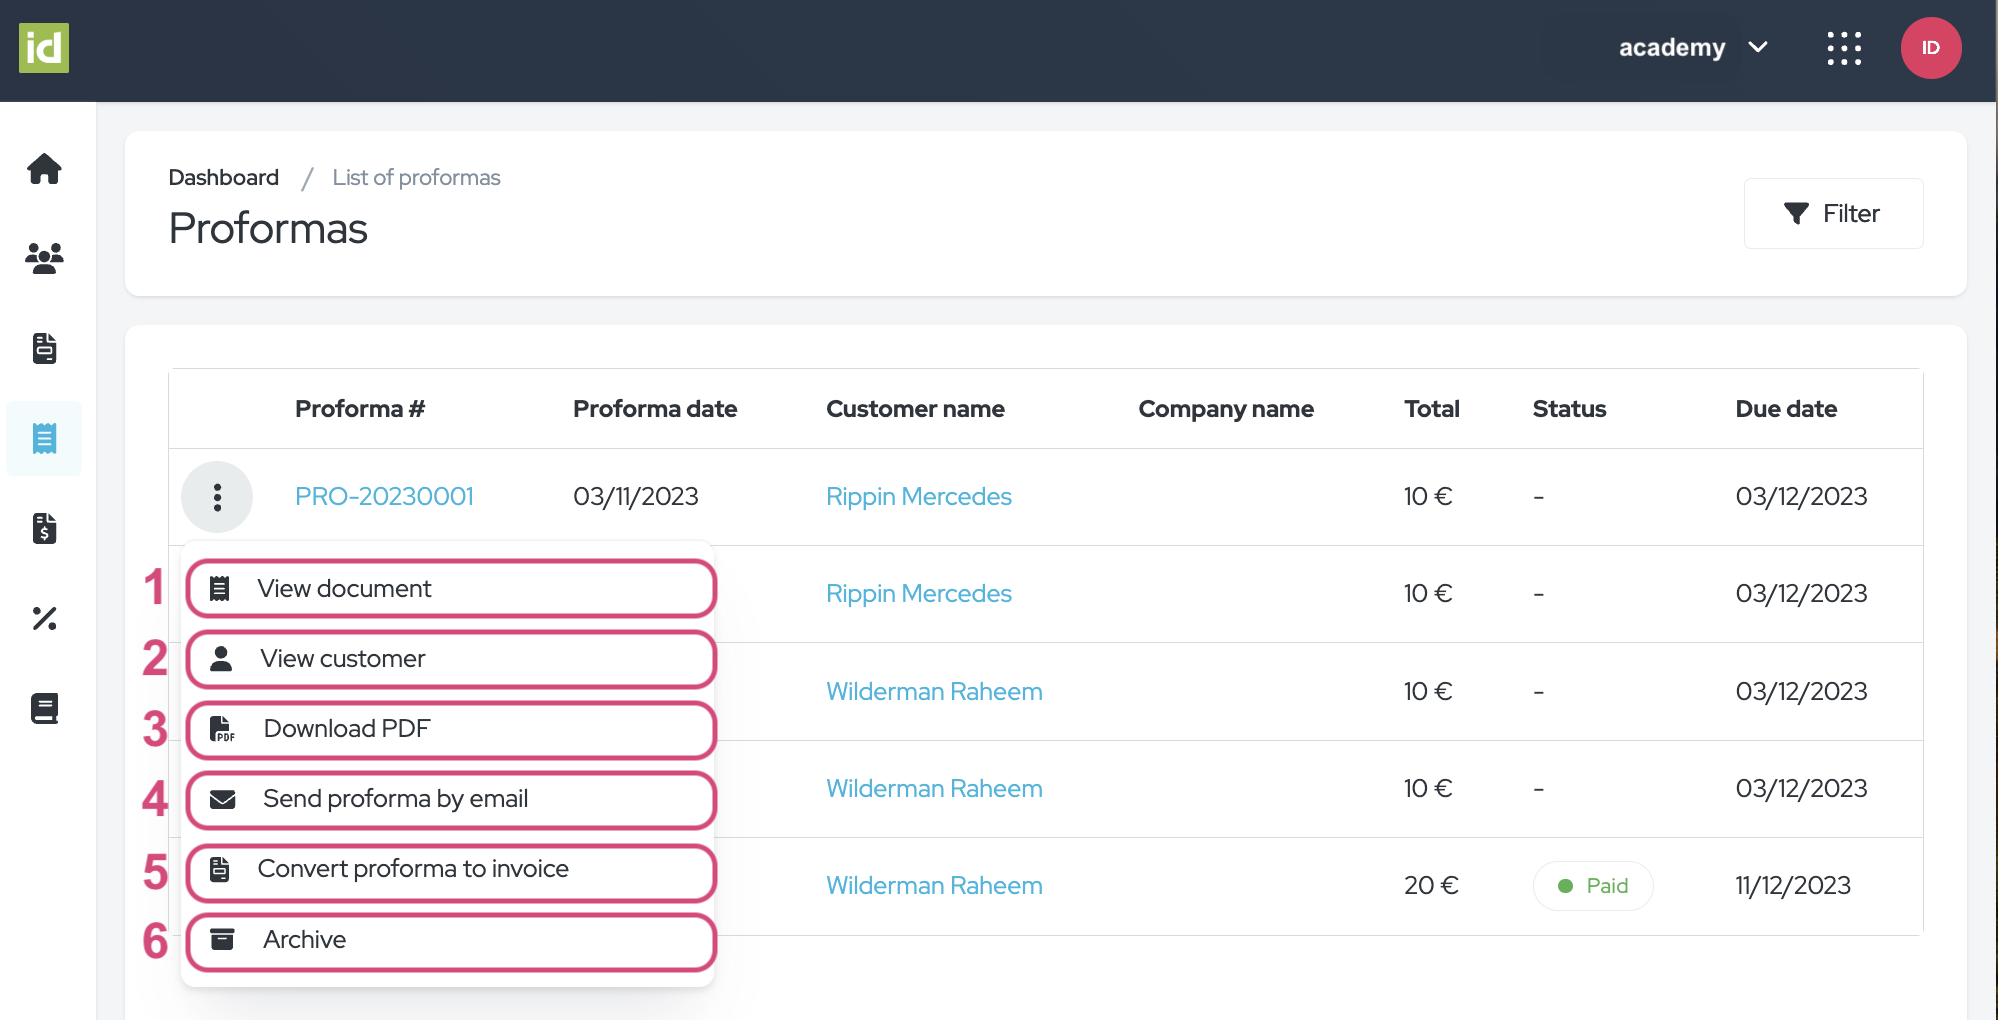
Three-dots menu actions
Navigate to the Invoice Module > Proforma section and click on the three-dots menu.
- View the document details.
- View the Customer details.
- Download the document as a PDF.
- Send the Proforma via email to the Customer.
- Convert your Proforma to an Invoice.
- Archive/Restore depending on the current status of the document.
Note: if your document is archived, you also can permanently delete a document.
3. Invoices
It is important to note that only one active invoice can be associated with each registration. If the Event Organizer makes changes, you will be prompted to generate a credit note and new invoice. If the attendee modifies the form, categories or options will automatically generate a credit note for the full amount, along with a new invoice.
If the Attendee makes any changes to their Categories and Options or modifies any of the following default fields, a new Invoice and Credit note will be automatically generated.
- Company name - cpy_name
- Street - cpy_street
- Street number - cpy_street_number
- Post box - cpy_street_box
- Zip code - cpy_zip_code
- City - cpy_city
- State - cpy_state
- Country - cpy_country
- VAT number - cpy_vat_number
- Your order reference or PO - inv_order_ref
- Invoice to the attention of - inv_to
Attendee Details - Events Module
Navigate to the Event > General > Attendees section.
Then, click on the desired Attendee.
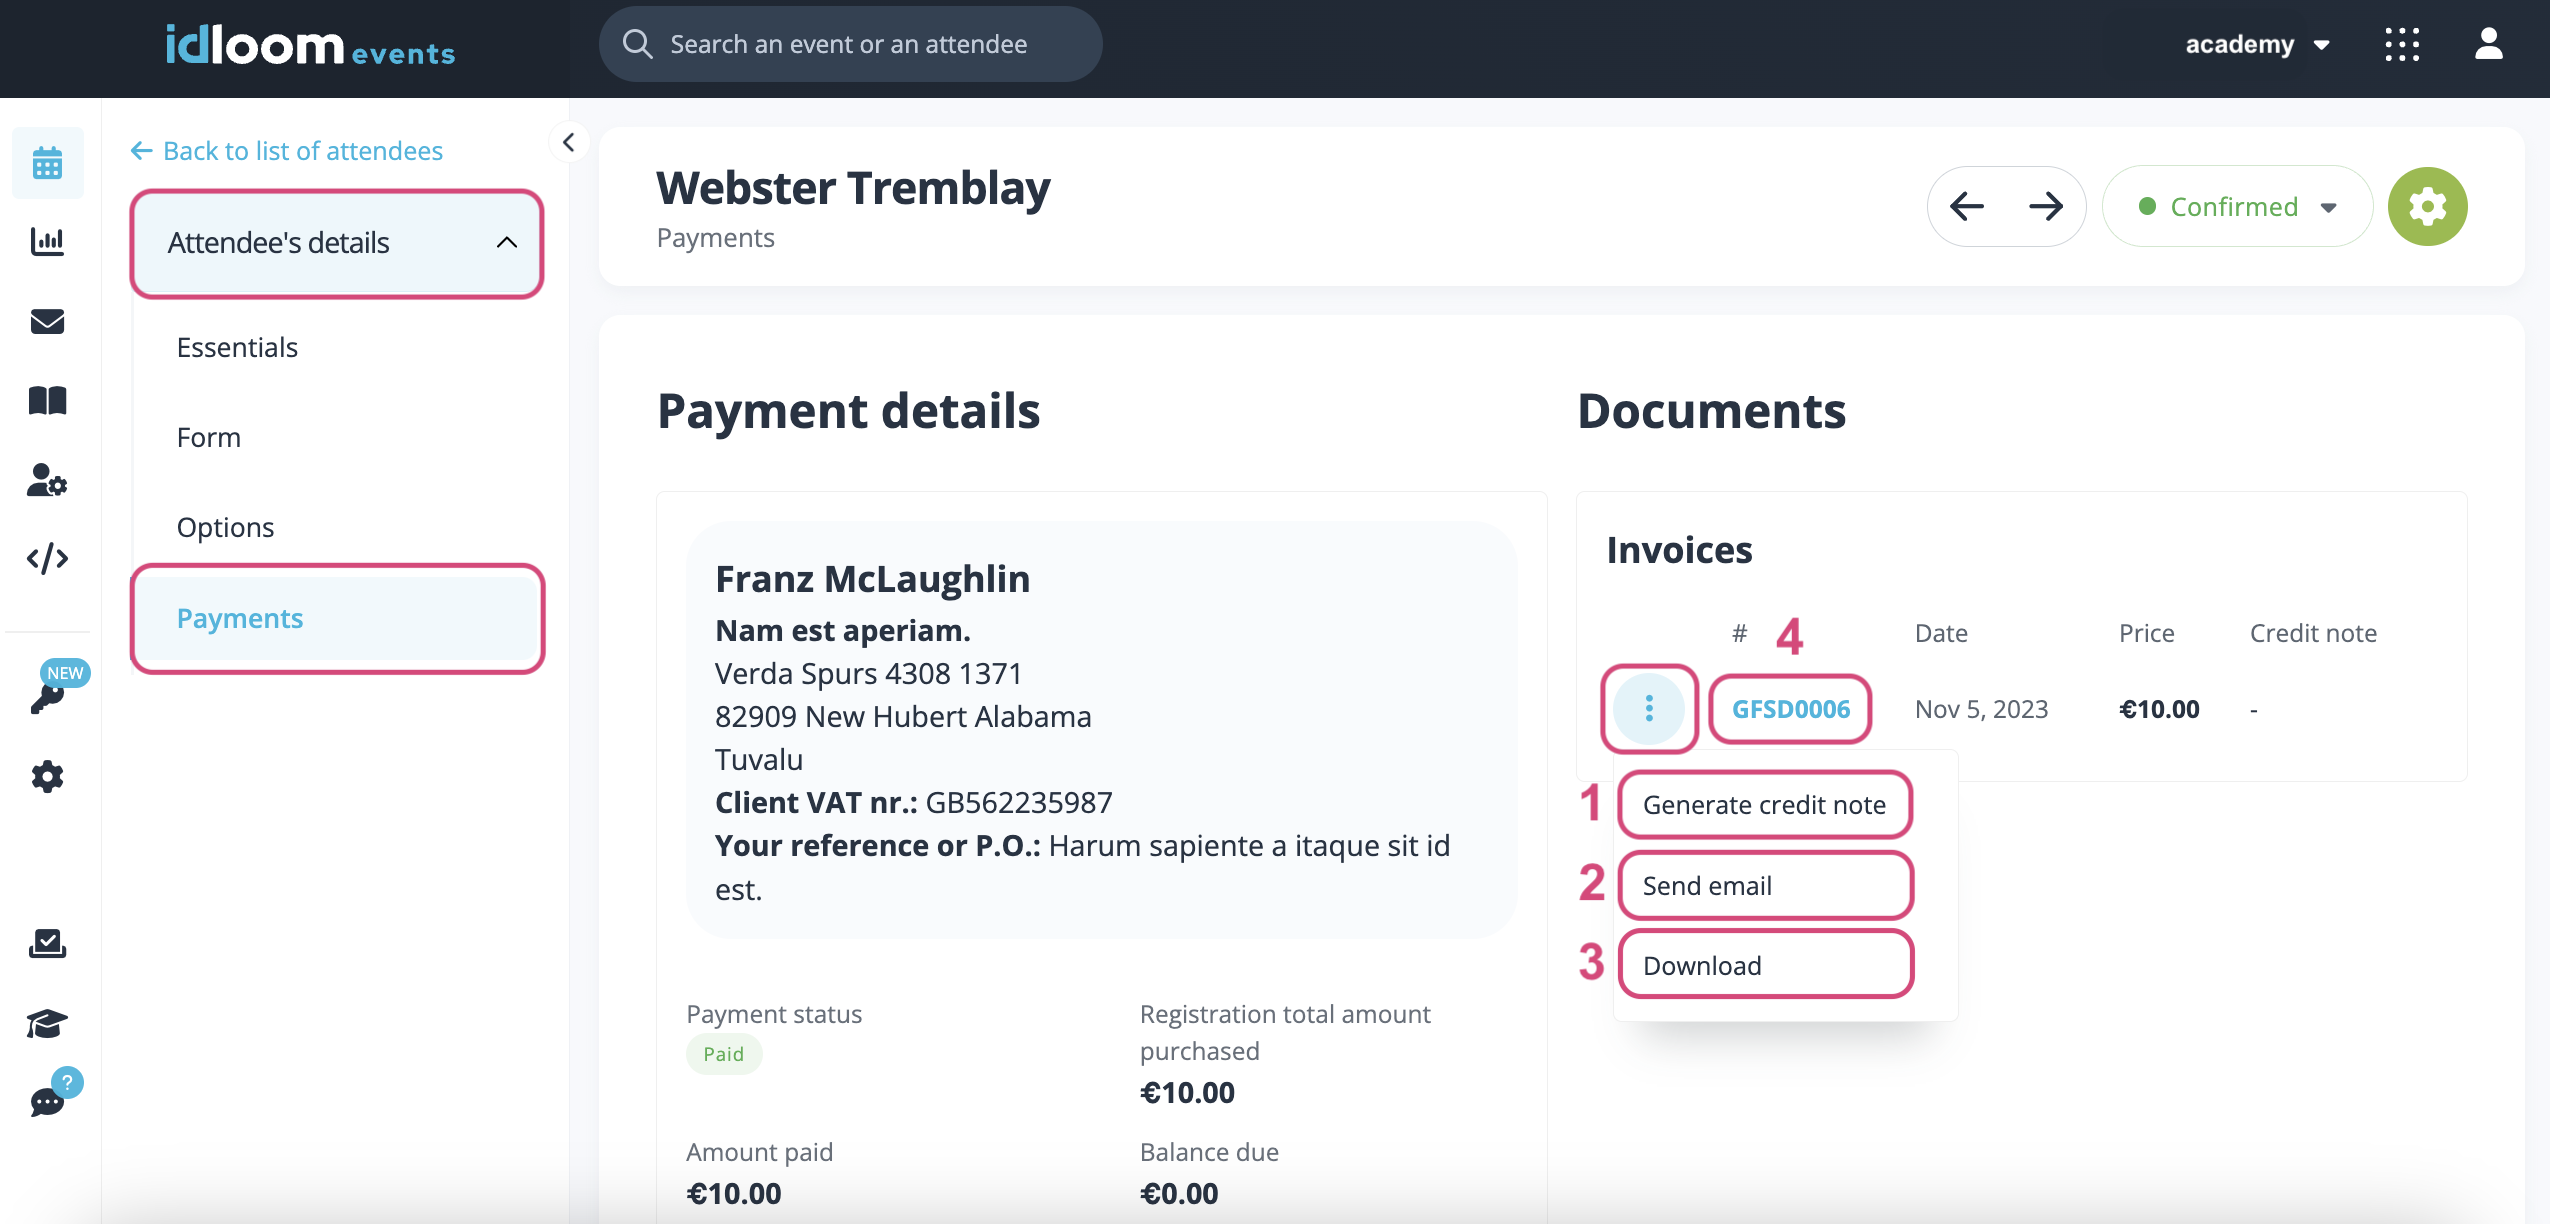
The following actions will be available to you from the three-dots menu next to the Invoice:
- Generate a Credit note – based on your Invoice, a Credit note will automatically be generated for the same amount.
Note: you can only generate one Credit note per existing Invoice.- If you have created a Credit Note for your Invoice, you can generate a new invoice by clicking on the "More actions" button and selecting "Generate an invoice”.
- Send email – you can send the financial document to the Attendee via email.
- Download – you can download the financial document.
- You can also click on Click on the name of the financial document to view it.
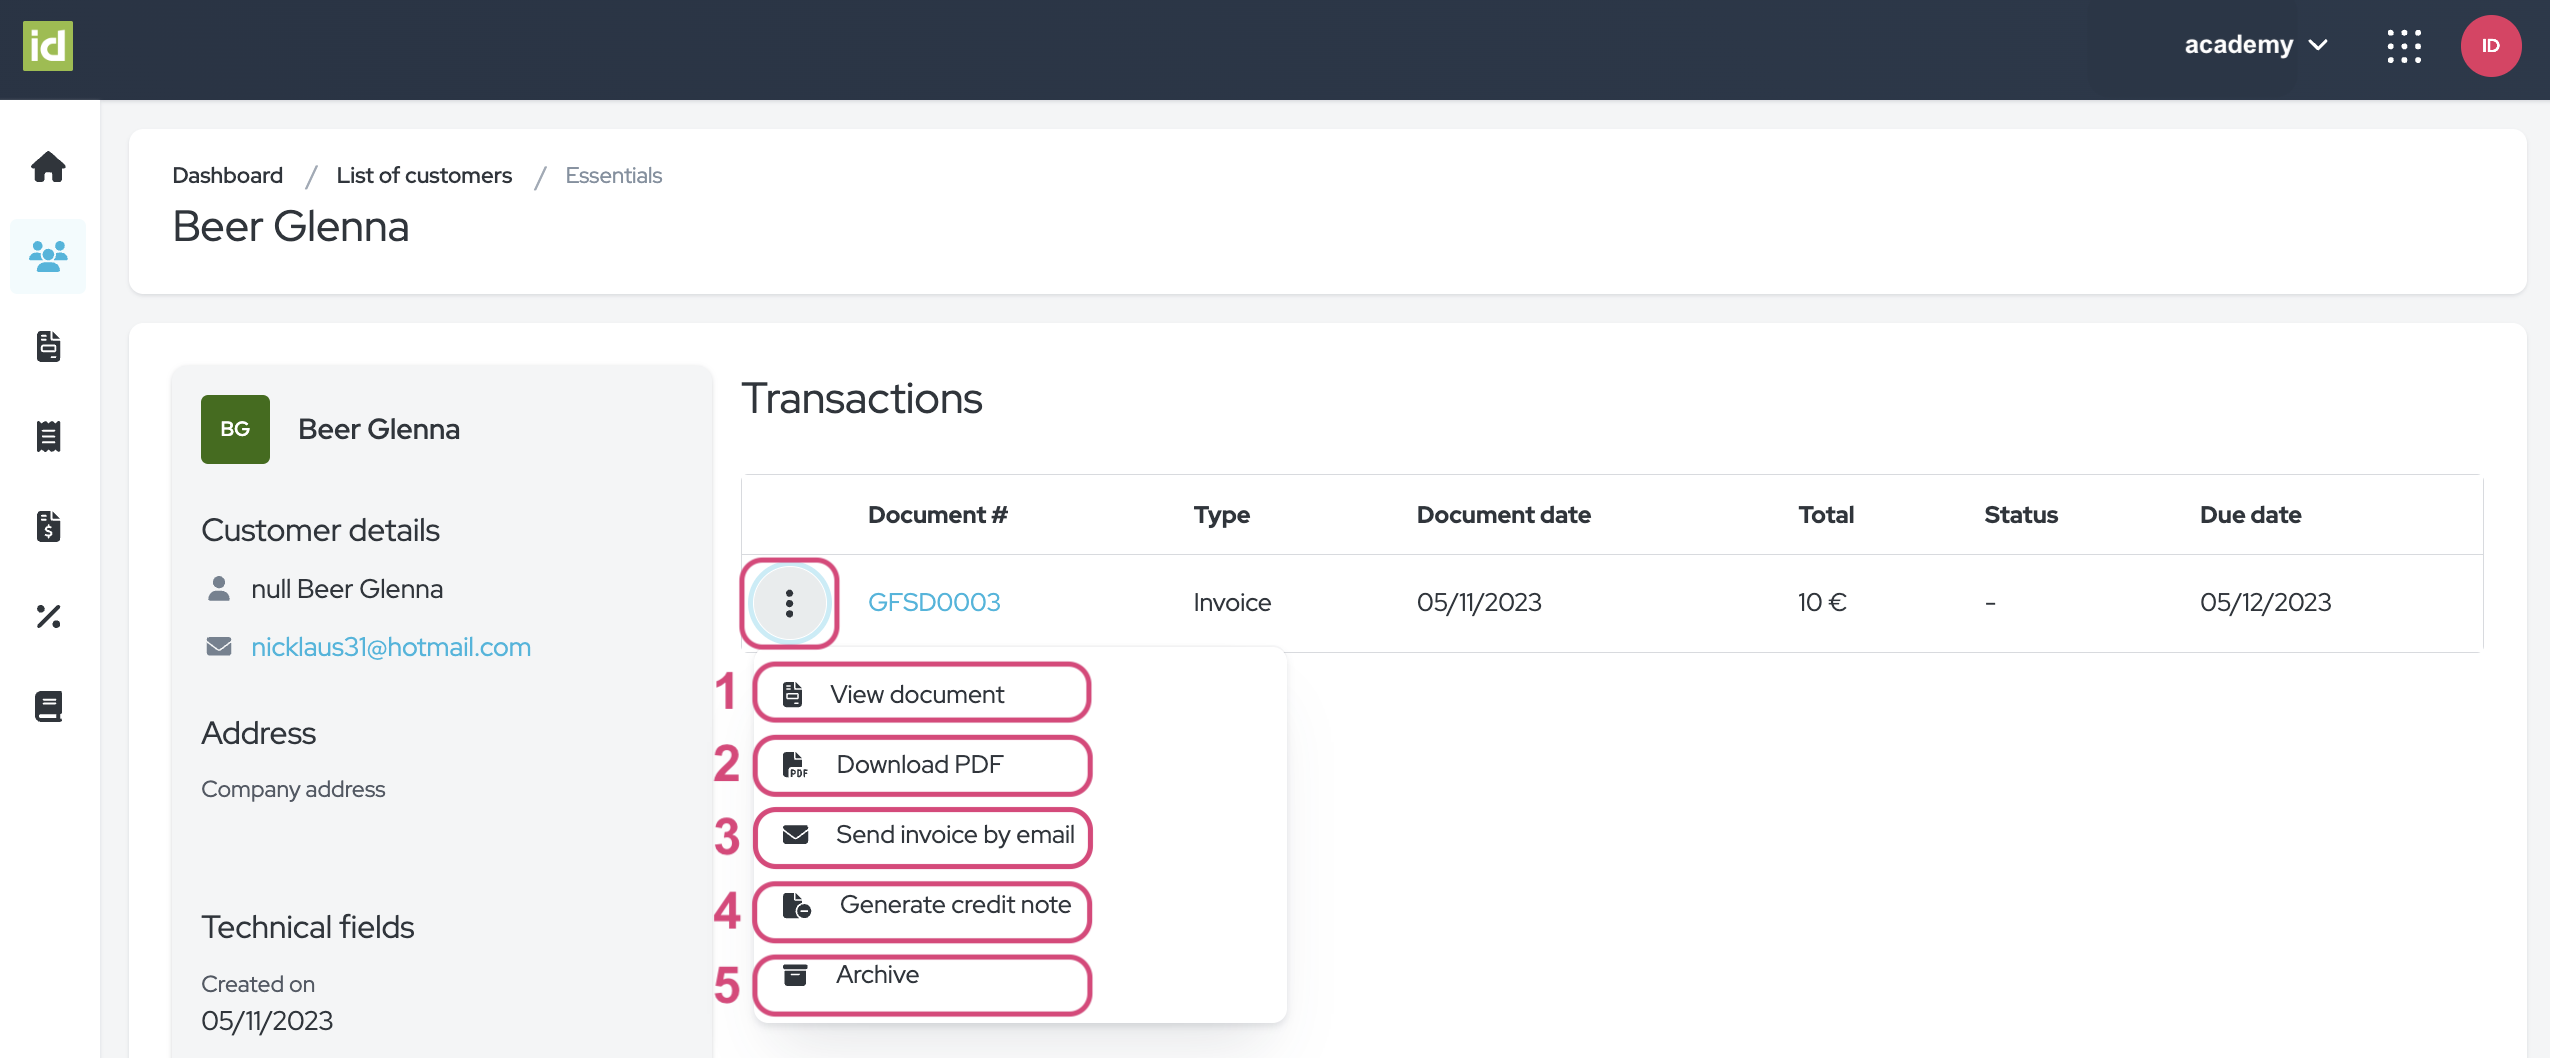
Customer Details - Invoice Module
Click on the name of the Customers to view their details.
Click on the three-dots menu to:
- View the document
- Download the documents as a PDF
- Send the Invoice by email to the Customer
- Generate a Credit note based on the Invoice. The amount will be the same on both documents.
- Archive the document (do not forget to click on the red checkmark to confirm).
Note: Only active documents are displayed. Click on the document number for details.
Invoices section - Invoice Module
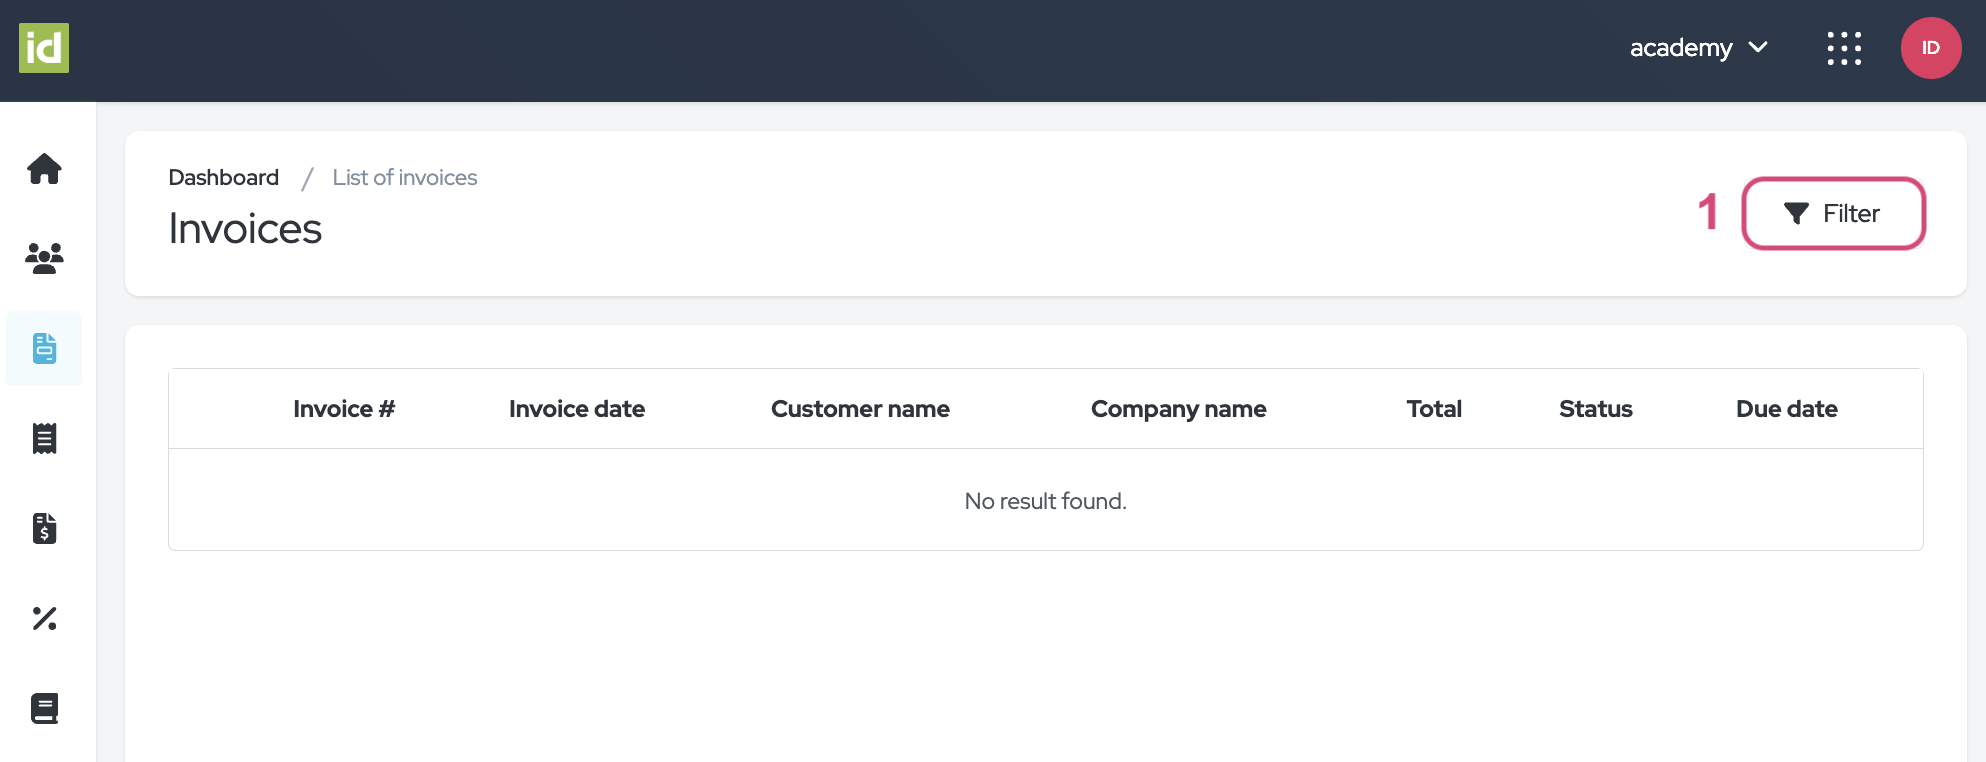
Navigate to the Invoice Module > Invoices section.
You can filter your documents, view details, and access more actions.
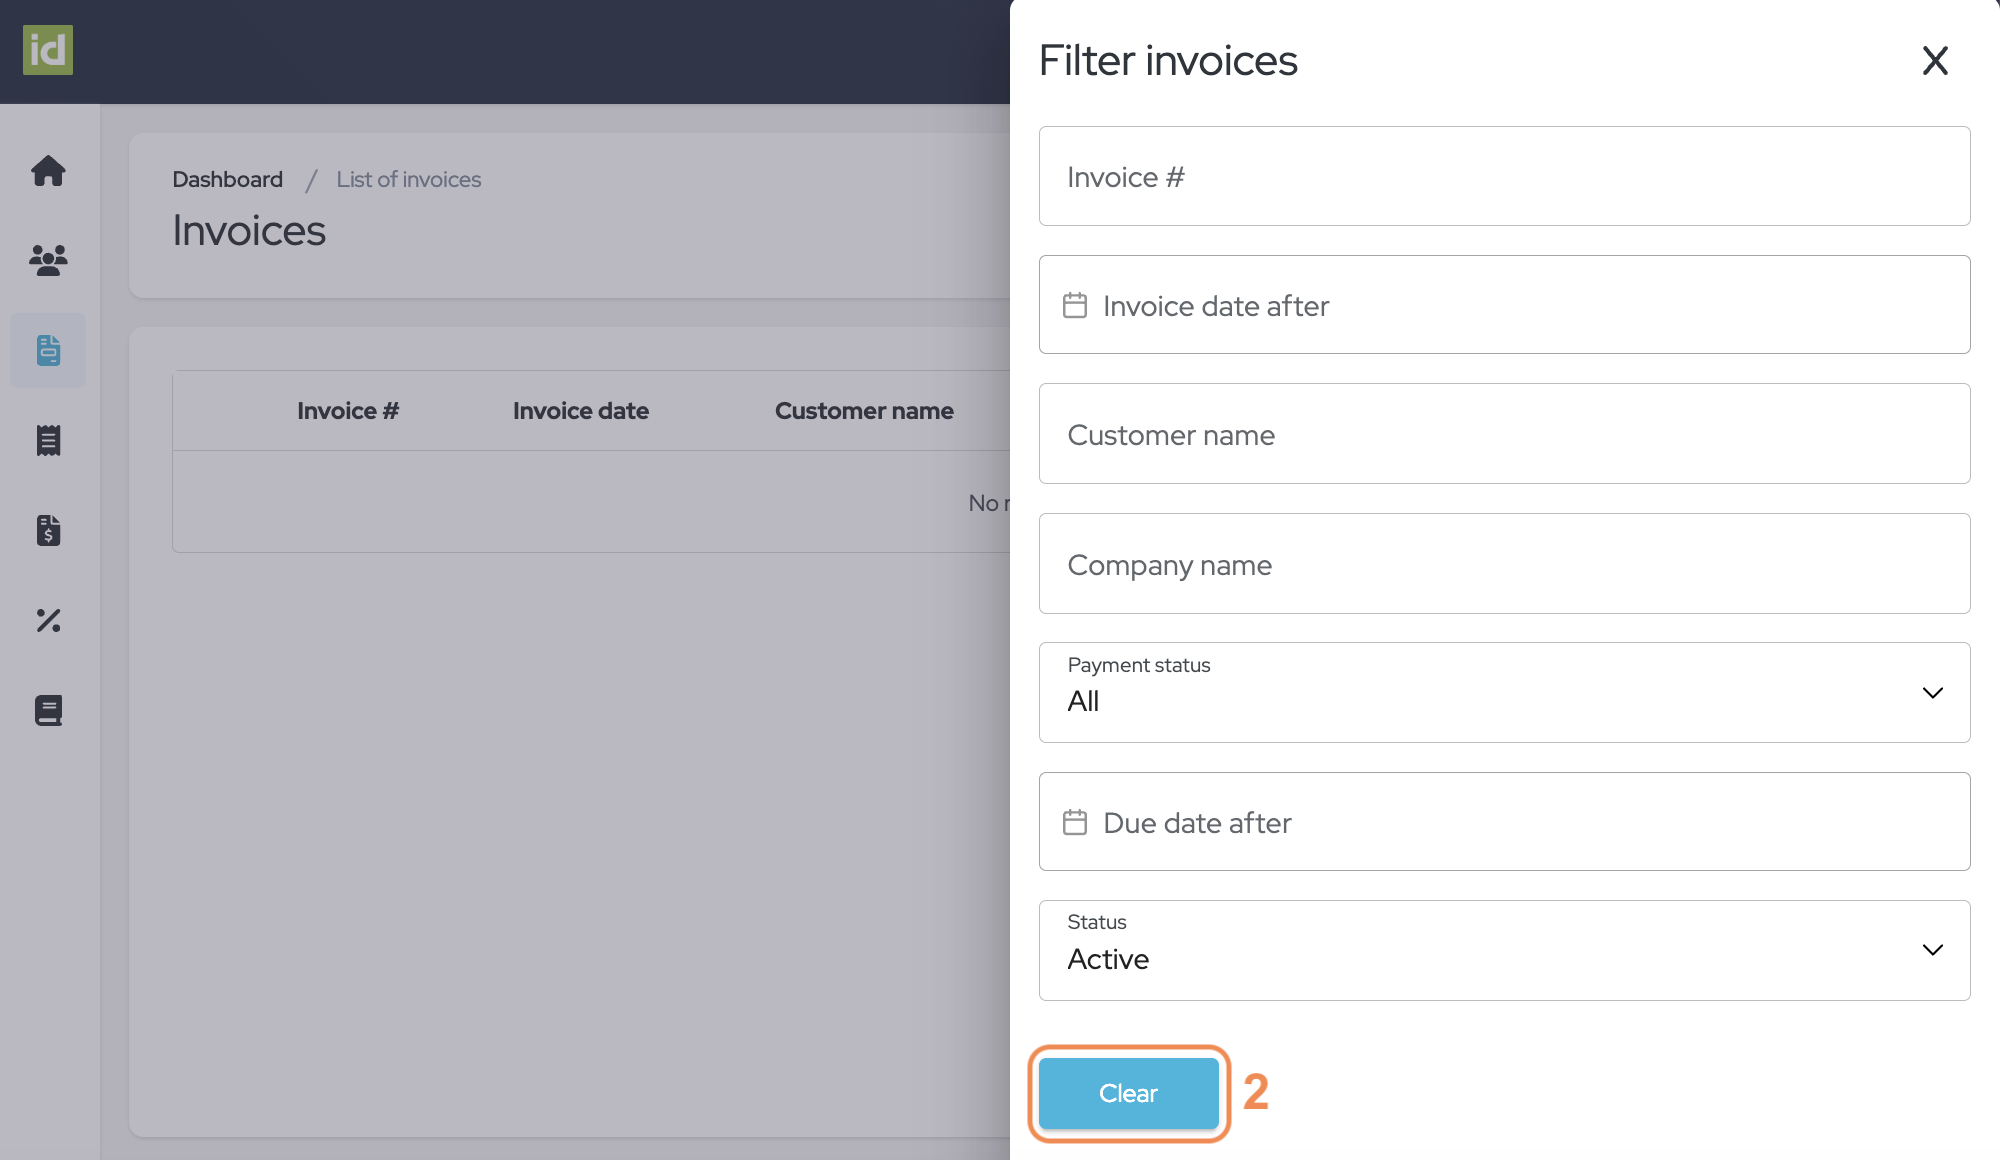
Filter
- Click on the “Filter” button.
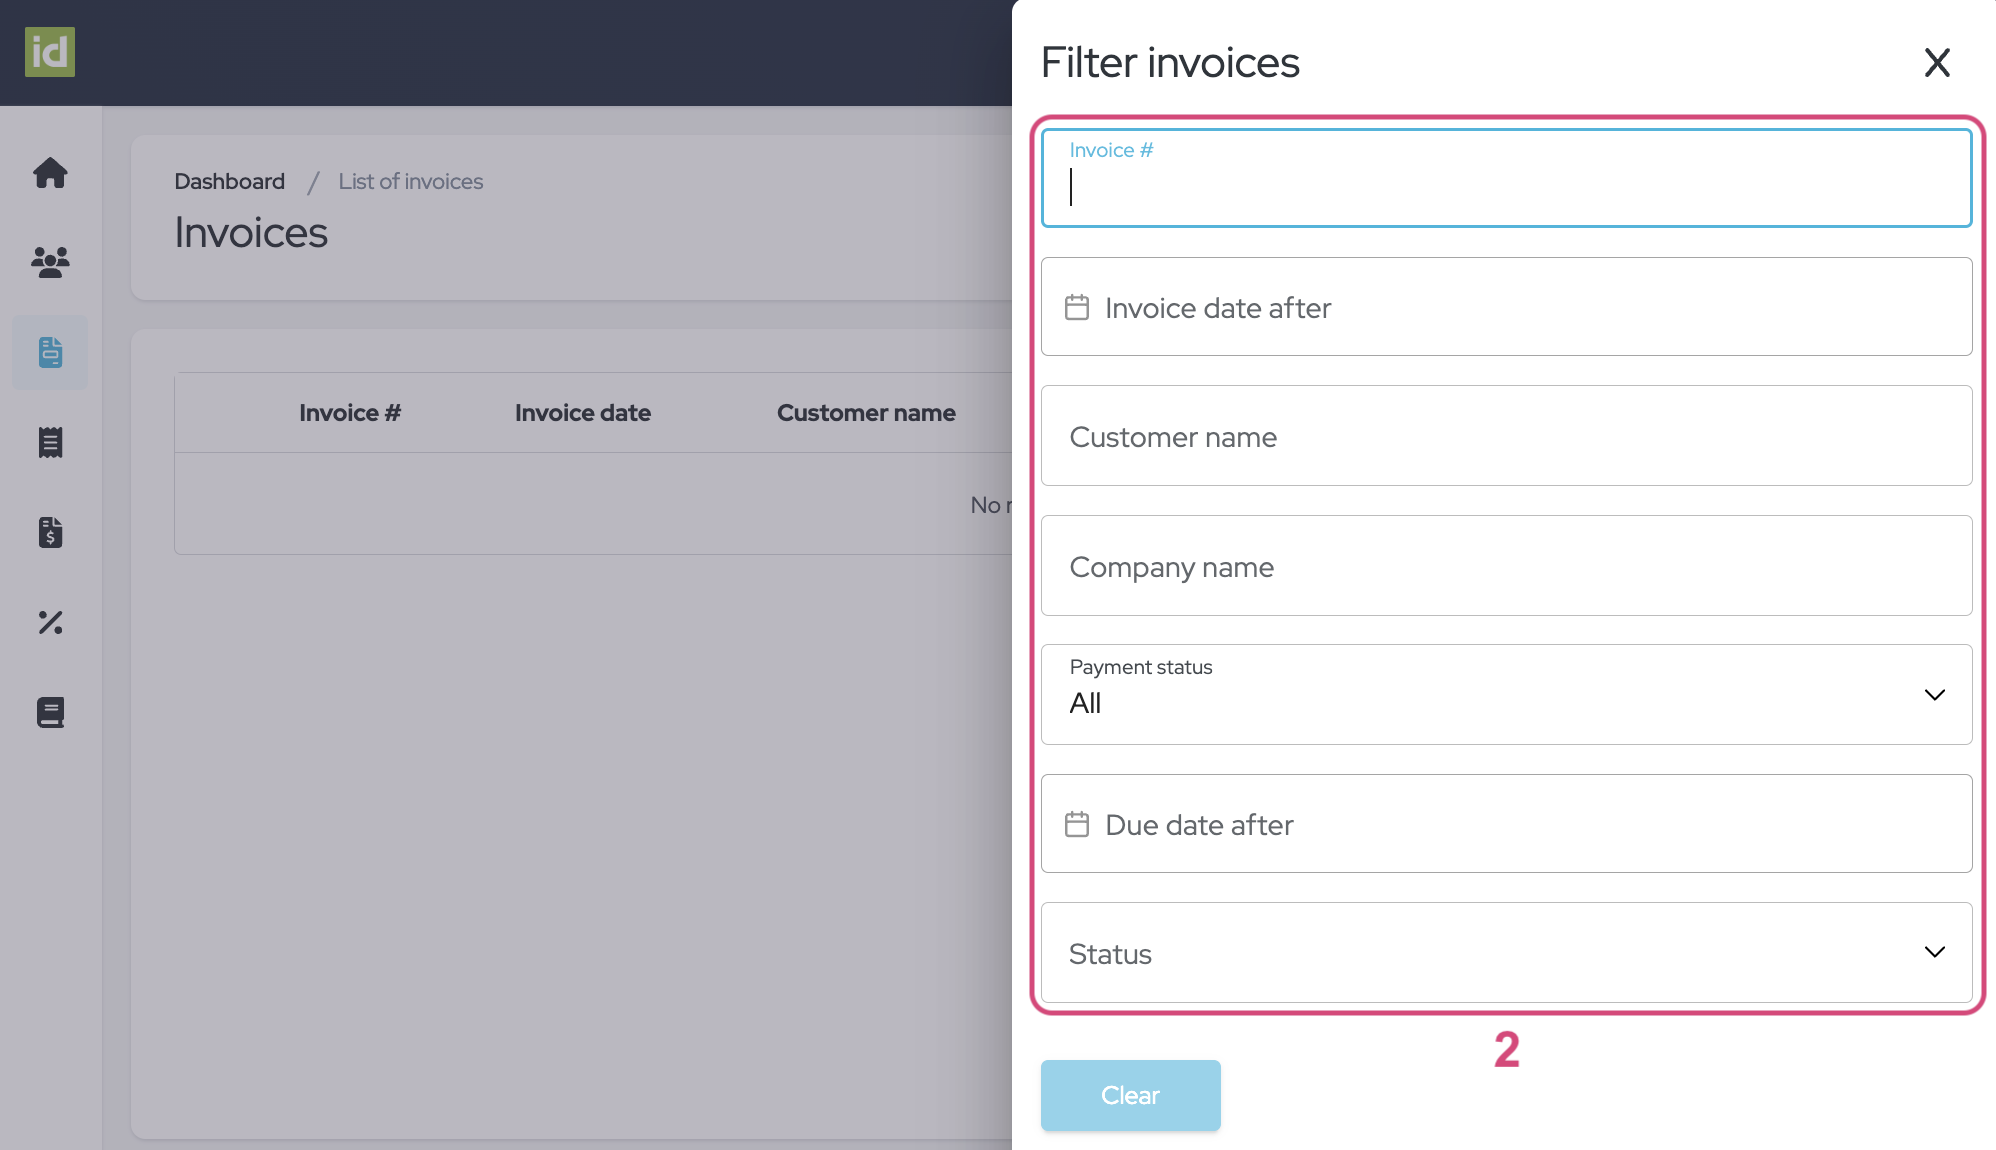
- Specify what criteria you would like to filter on. You can filter on one or multiple criteria.
- Invoice number - this allows you to filter on the number of the Invoice.
- Invoice date after - you can filter all documents issued after a specified date.
- Customer name - this allows you to filter on the name of the Customer linked to the Invoice.
- Company name - this allows you to filter on the name of the Company linked to the Invoice.
- Payment status – this choice list allows you to filter on the payment status of the document: All, Paid, or Not paid.
- Invoice due date after - you can filter all documents issued with a due date after a specified date.
- Status – this choice list allows you to filter the status of the document: Active or Archived.
No need to save, your changes are directly applied.
Remove filters
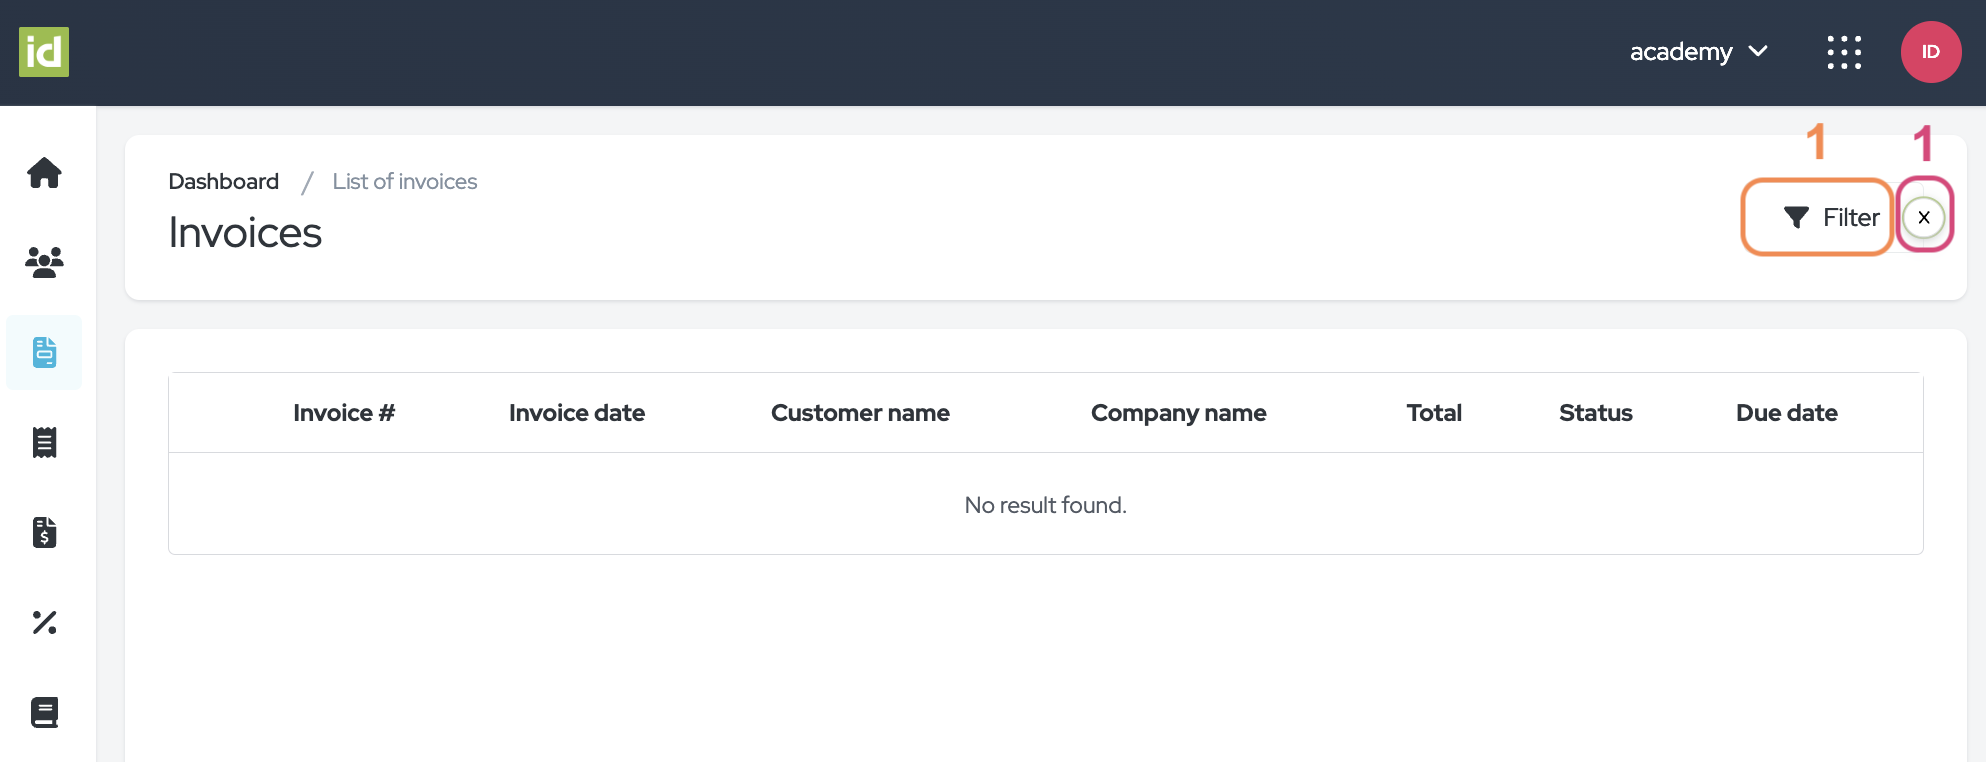
- Click on the cross next to the “Filter” button.
OR
- Click on the “Filter” button.
- Then on the “Clear” button to clear your filters and to display the complete list of Invoices.
Details of an Invoice
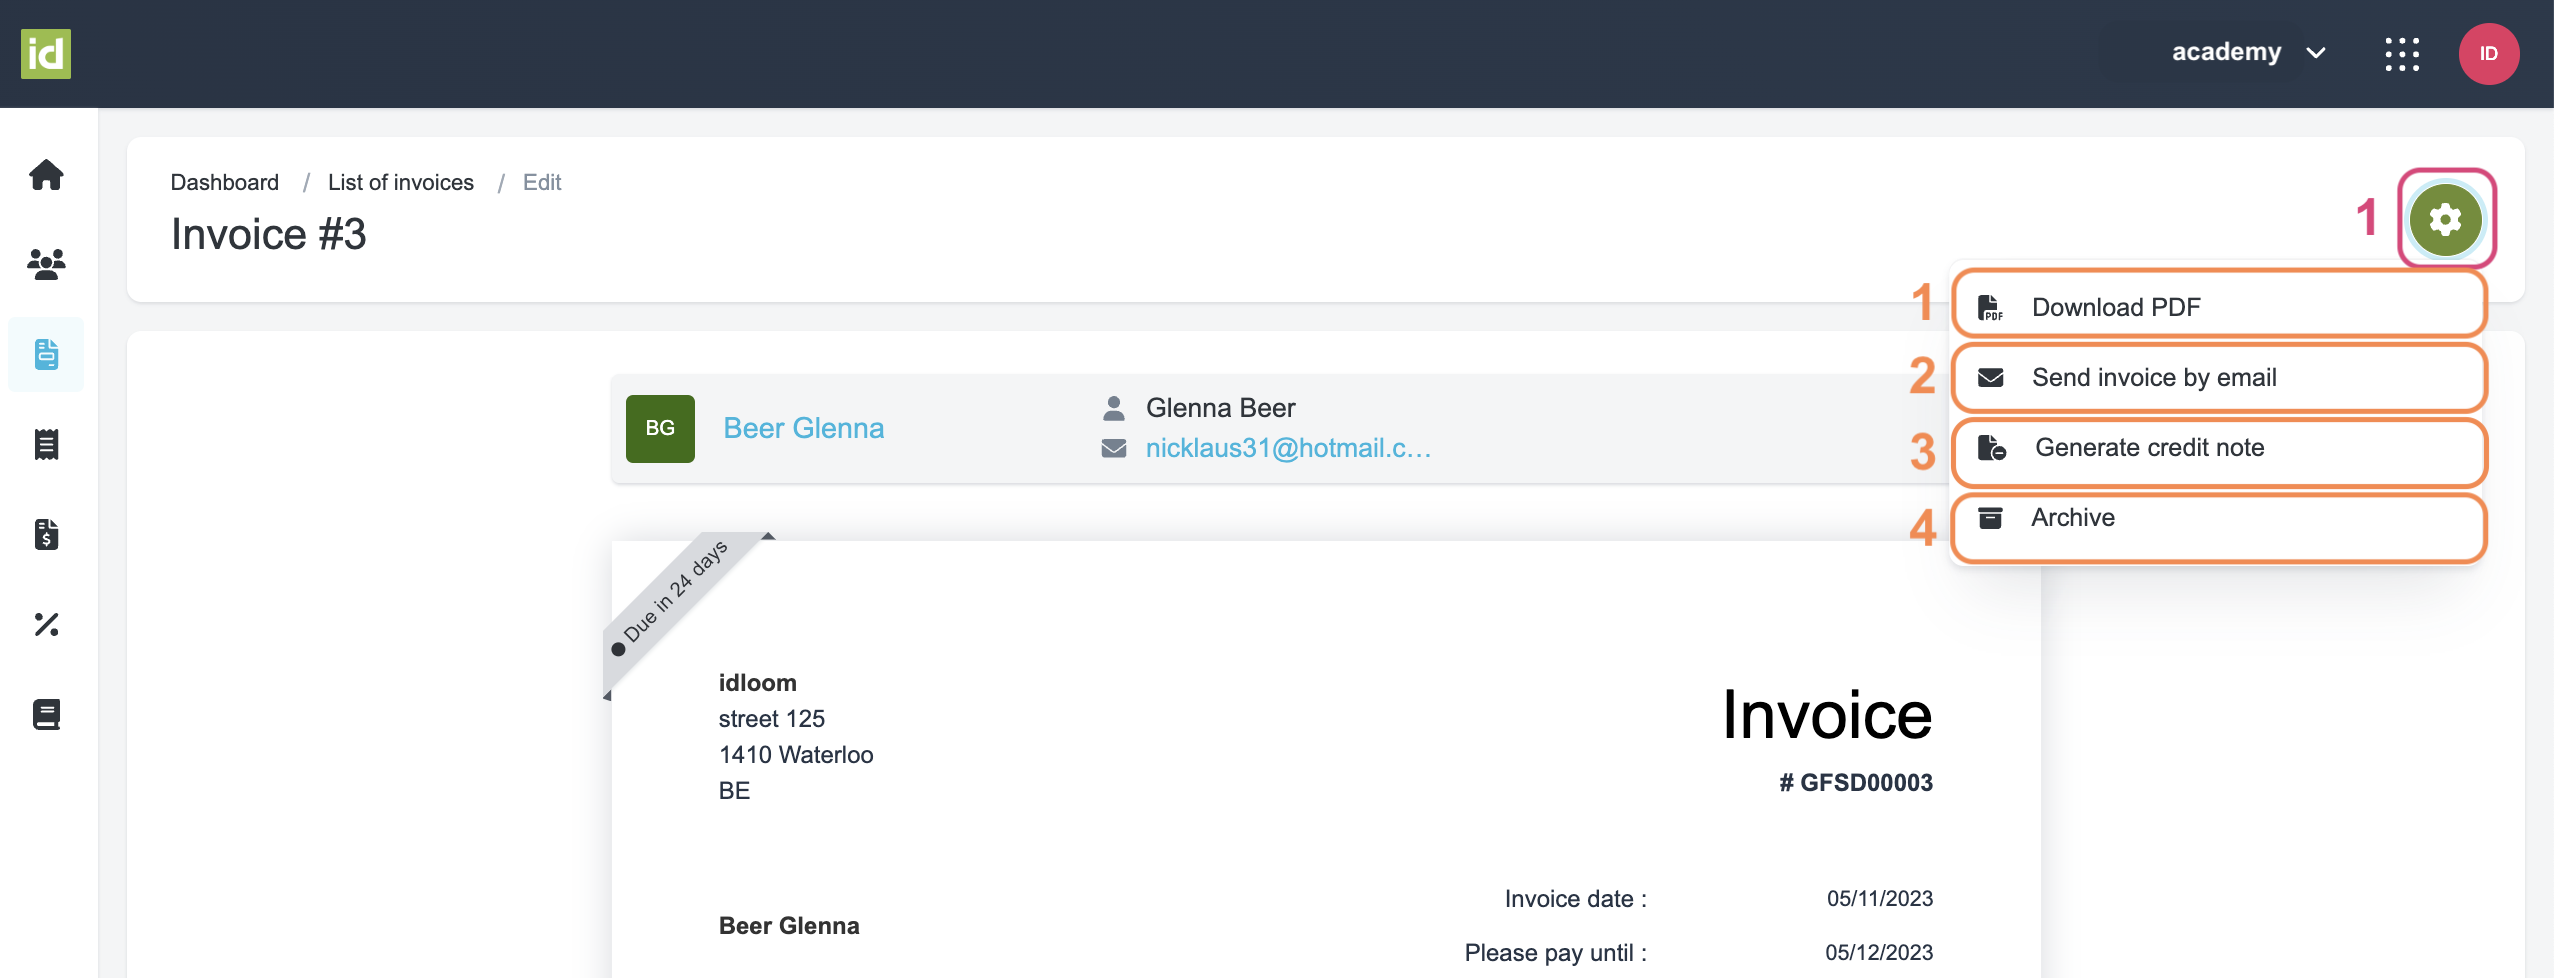
Click on the name of the document to view its details.
- Click on the “More action” button to:
- Download the documents as a PDF
- Send the Invoice by email to the Customer
- Generate a Credit note based on the Invoice. The amount will be the same on both documents.
- Archive the document (do not forget to click on the red checkmark to confirm).
Note: you can click on the Customer’s name to be redirected to the Customer details section.
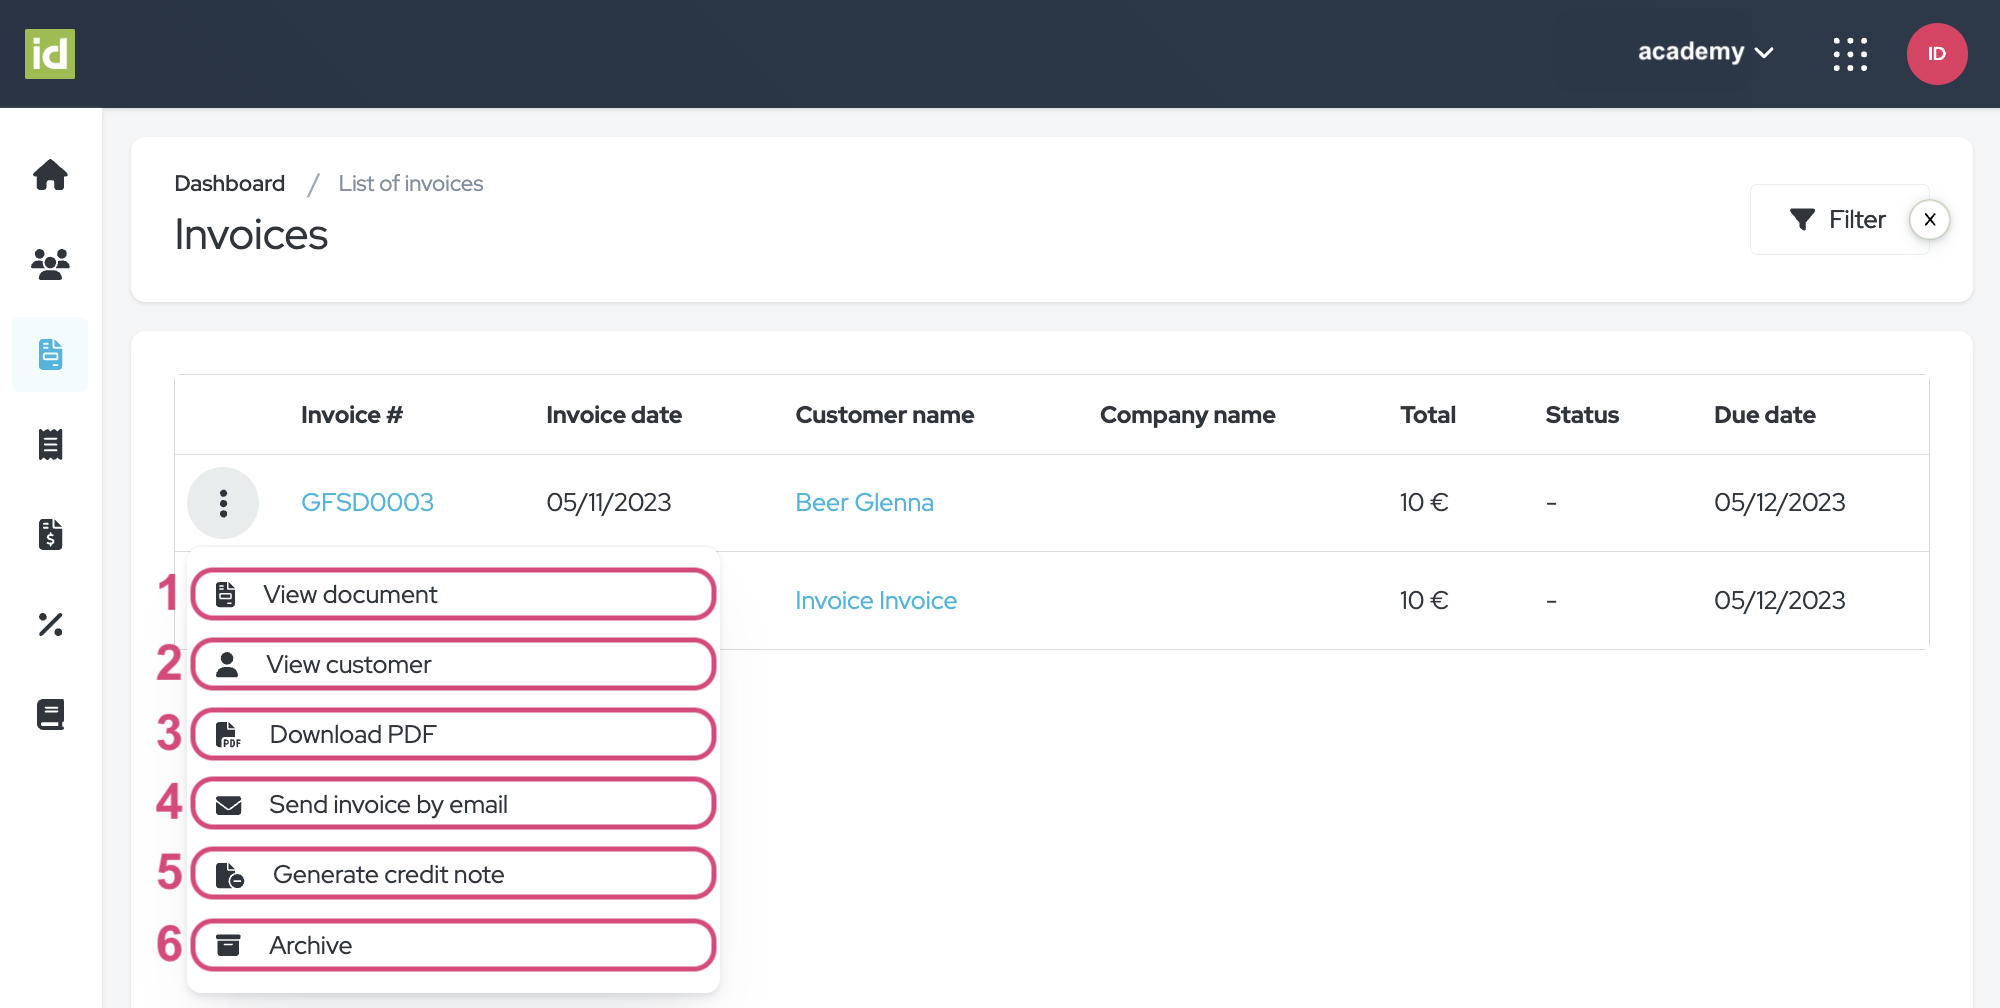
Three-dots menu actions
Navigate to the Invoice Module > Invoices section and click on the three-dots menu.
- View the document details.
- View the Customer details.
- Download the document as a PDF.
- Send the Invoice via email to the Customer.
- Generate a Credit note based on the Invoice.
- Archive/Restore depending on the current status of the document.
Note: if your document is archived, you also can permanently delete the document.
Invoices section - Events Module
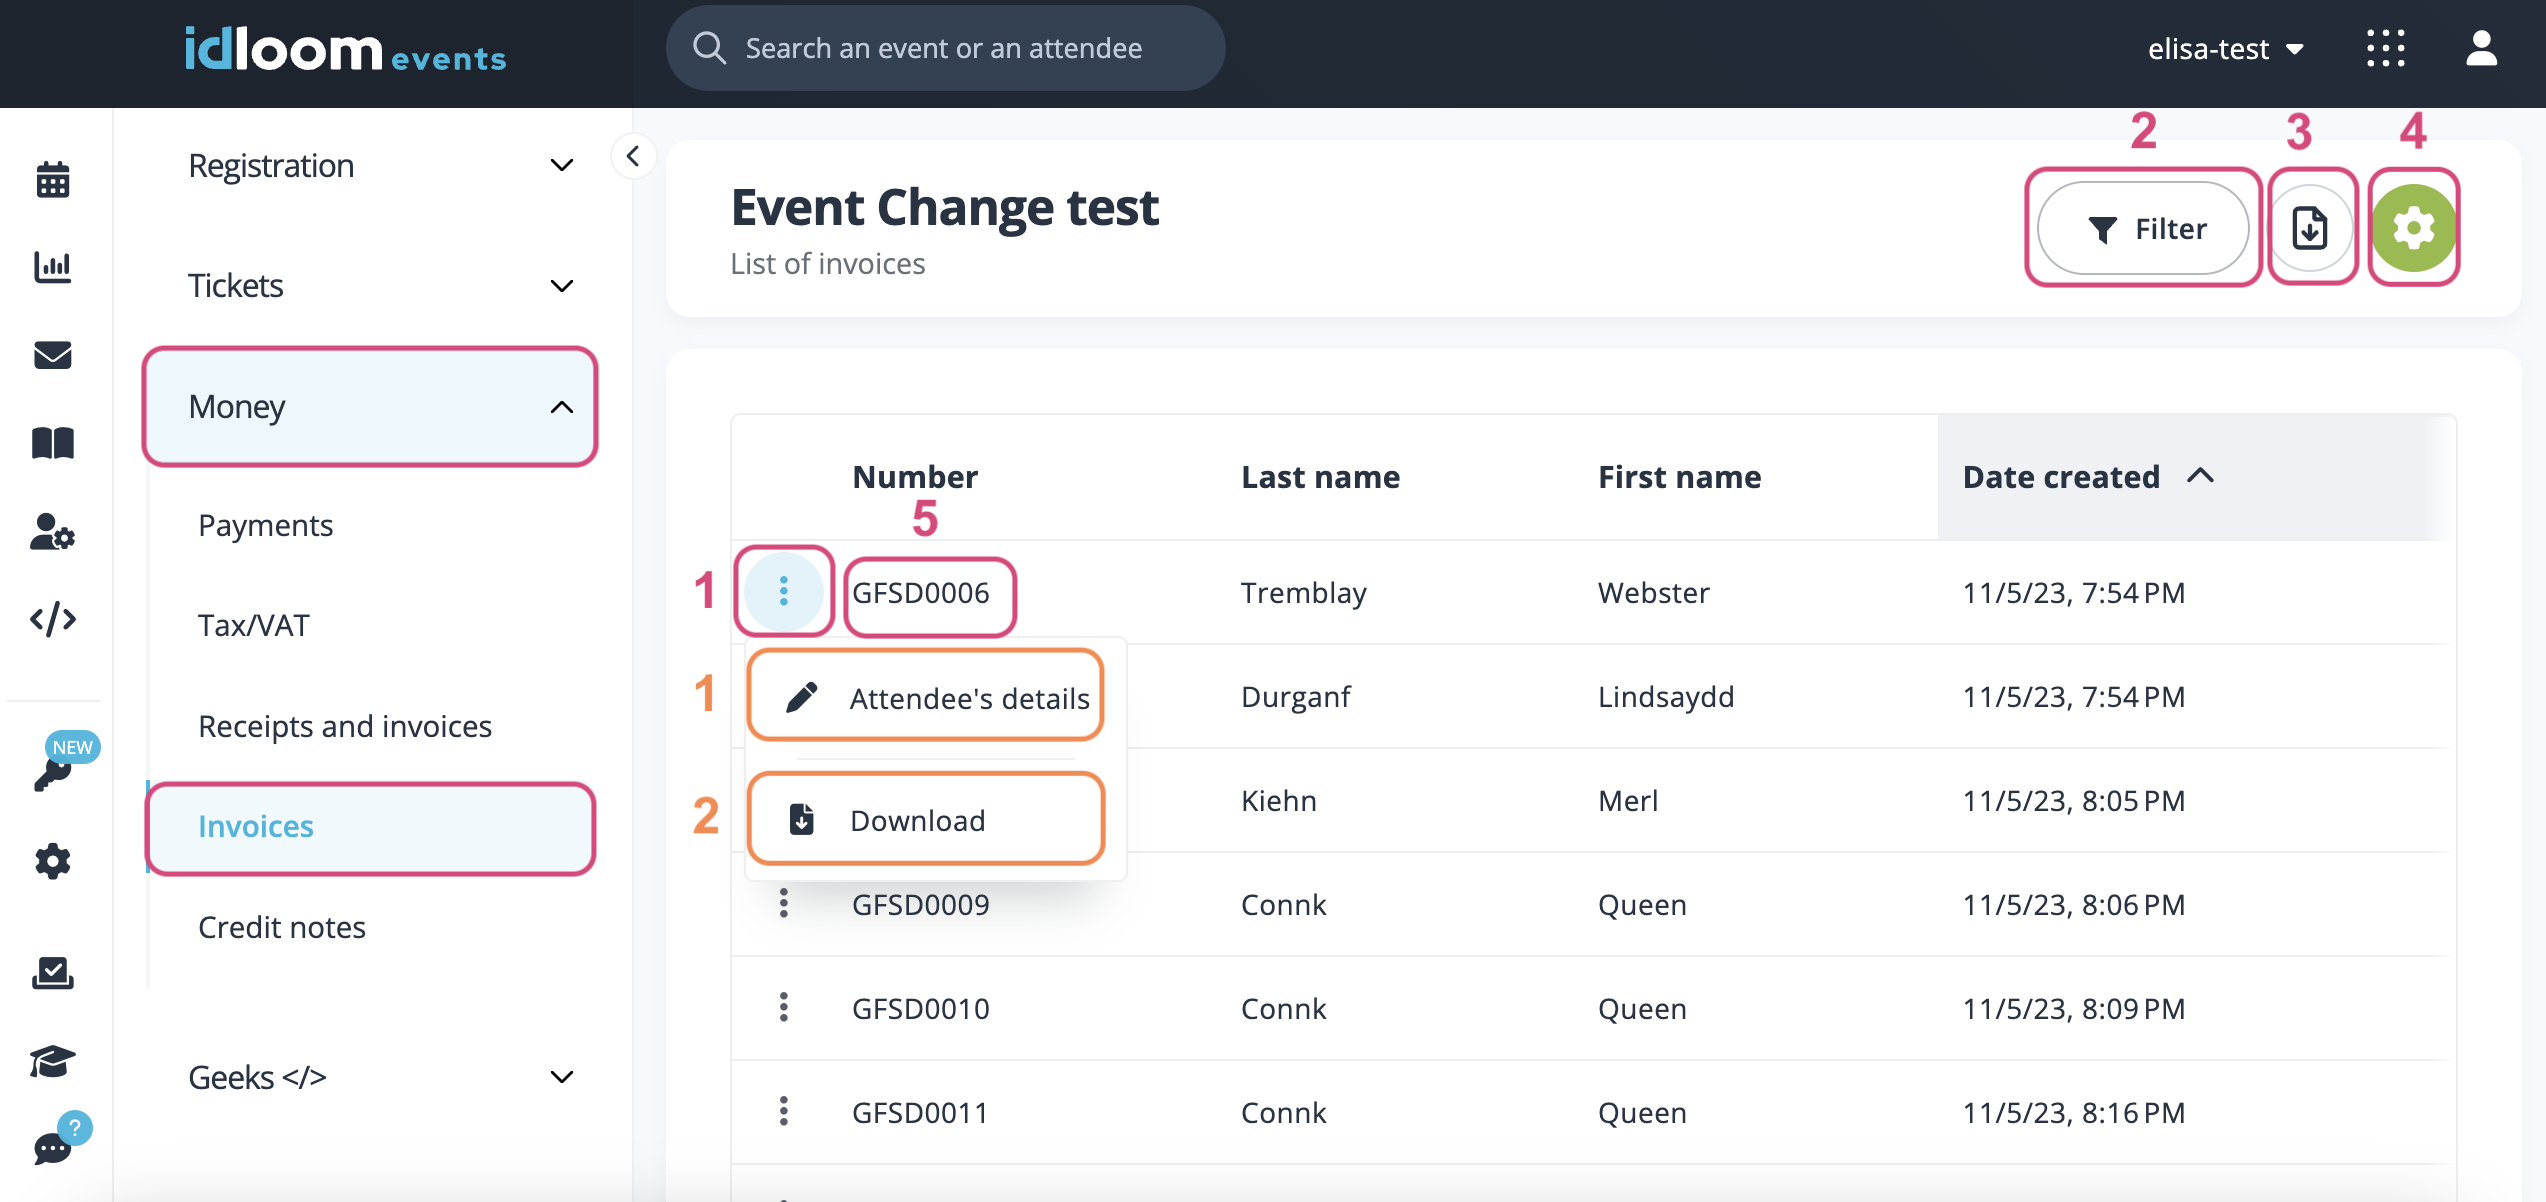
Navigate to the Events Module > Money > Invoices section.
You will have the following actions for you to make on this page:
- Click on the three-dots menu to:
- Download the document
- Get to the Attendee’s detail page for more actions.
- Click on the “Filter” button to filter your overview.
- Click on the “Export” button, to export in an Excel or CSV file, details of the invoices that have been issued.
- Click on the “More action” button, to export all the financial documents of this section.
- Click on the name of the financial document to view it.
4. Credit notes
To generate a credit note, you must use an invoice as a reference.
Attendee Details - Events Module
Navigate to the Event > General > Attendees section.
Then, click on the desired Attendee.
The following actions will be available to you from the three-dots menu next to the Credit note:
- Send email – you can send the financial document to the Attendee via email.
- Download – you can download the financial document.
- You can also click on click on the name of the financial document to view it.

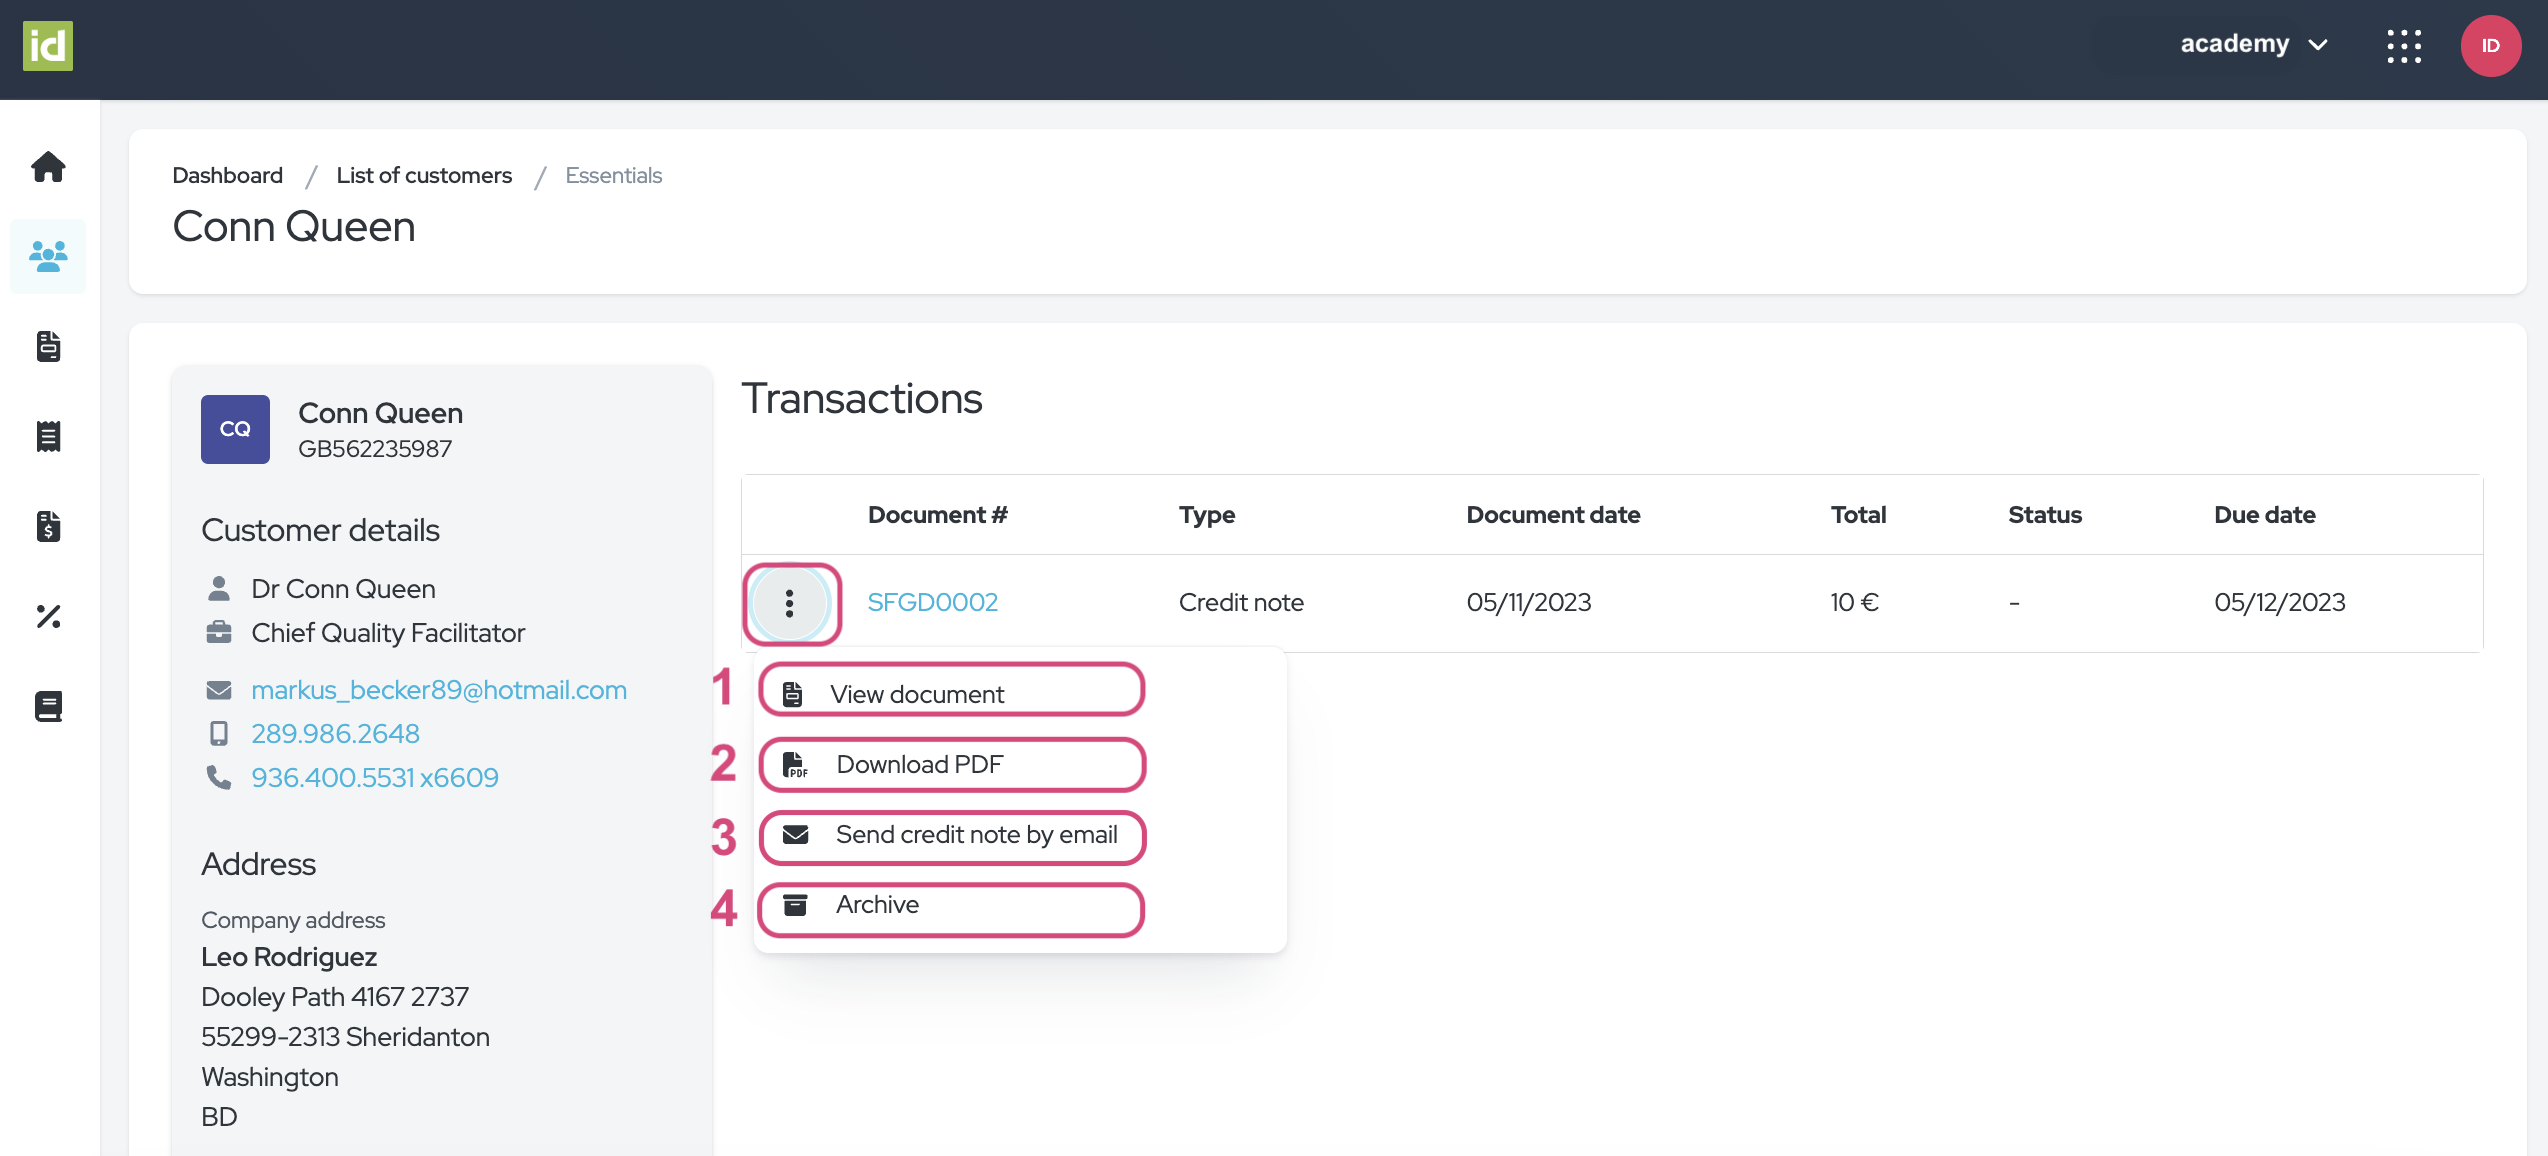
Customer Details - Invoice Module
Click on the name of the Customers to view their details.
Click on the three-dots menu to:
- View the document
- Download the documents as a PDF
- Send the credit note by email to the Customer
- Archive the document (do not forget to click on the red checkmark to confirm).
Note: you will only see active documents in this section. If you click on the document number, you will be redirected to its details.
Credit notes section - Invoice Module
Navigate to the Invoice Module > Credit notes section.
You can filter your document overview, see the details of a document, or click on the three-dots menu for more actions.
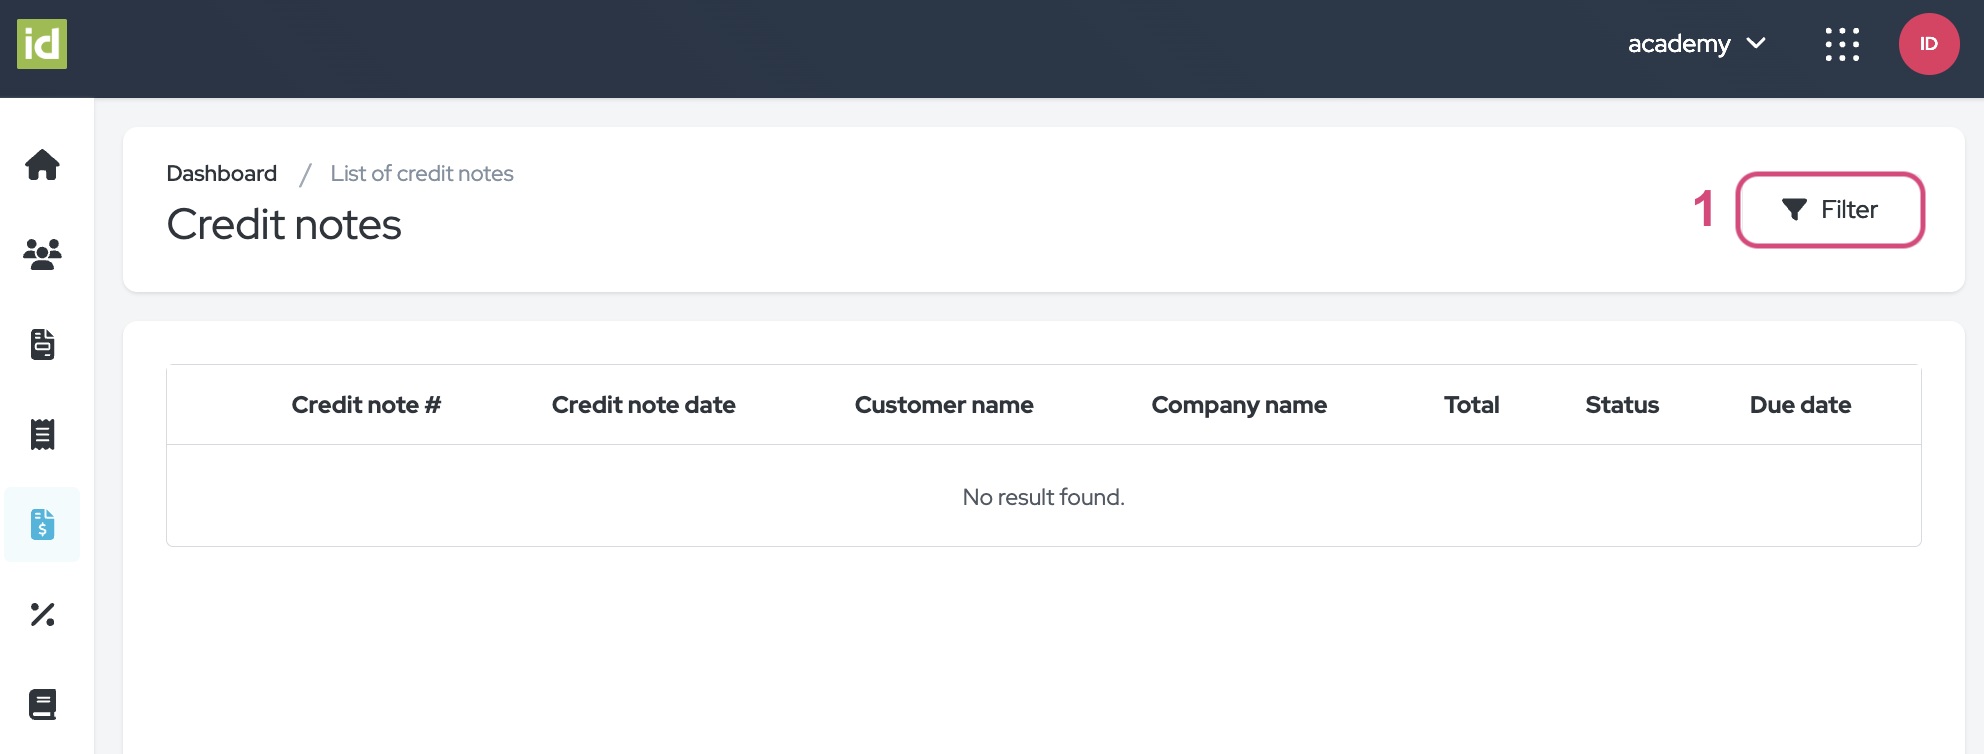
Filter
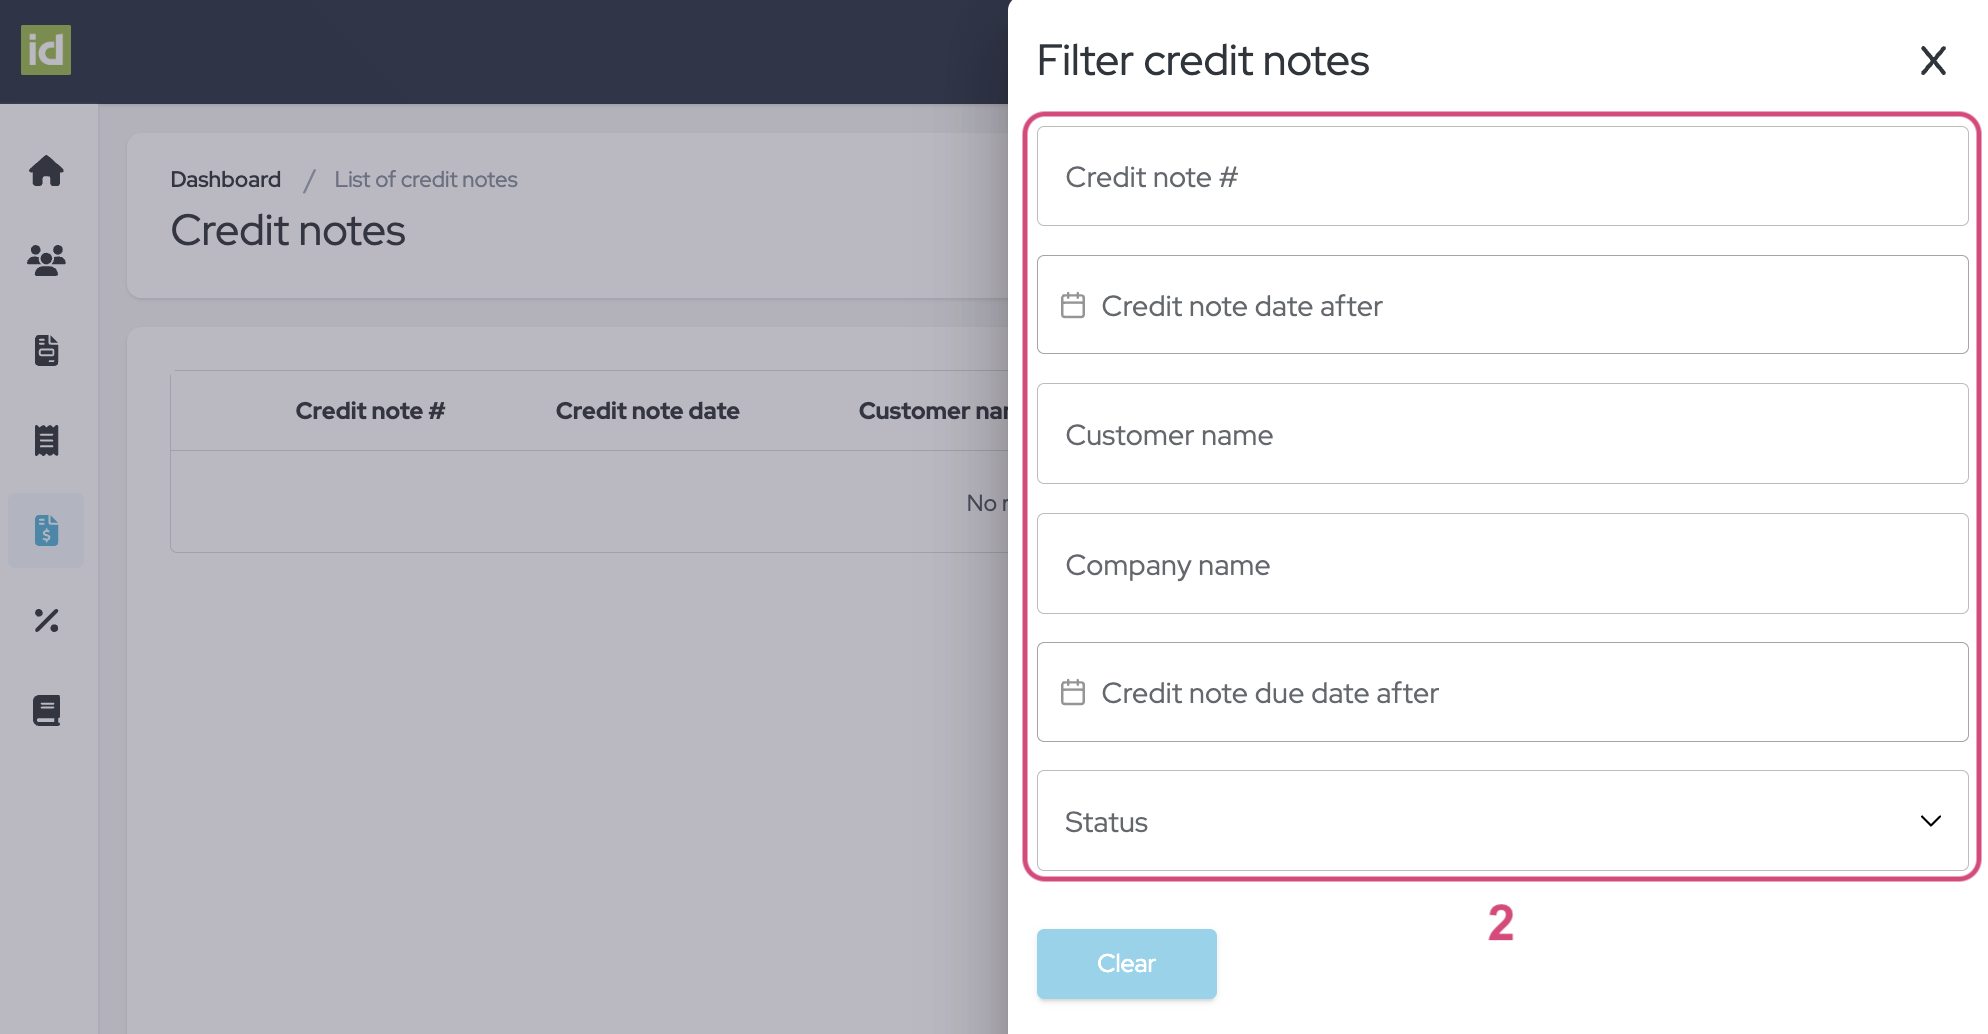
- Click on the “Filter” button.
- Specify what criteria you would like to filter on. You can filter on one or multiple criteria.
- Credit note number - this allows you to filter on the number of the Credit note.
- Credit note date after - you can filter on all documents issued after a specified date.
- Customer name - this allows you to filter on the name of the Customer linked to the Credit note.
- Company name - this allows you to filter on the name of the Company linked to the Credit note.
- Credit note due date after - you can filter all documents issued with a due date after a specified date.
- Status – this choice list allows you to filter the status of the document: Active or Archived.
No need to save, your changes are directly applied.
Remove filters
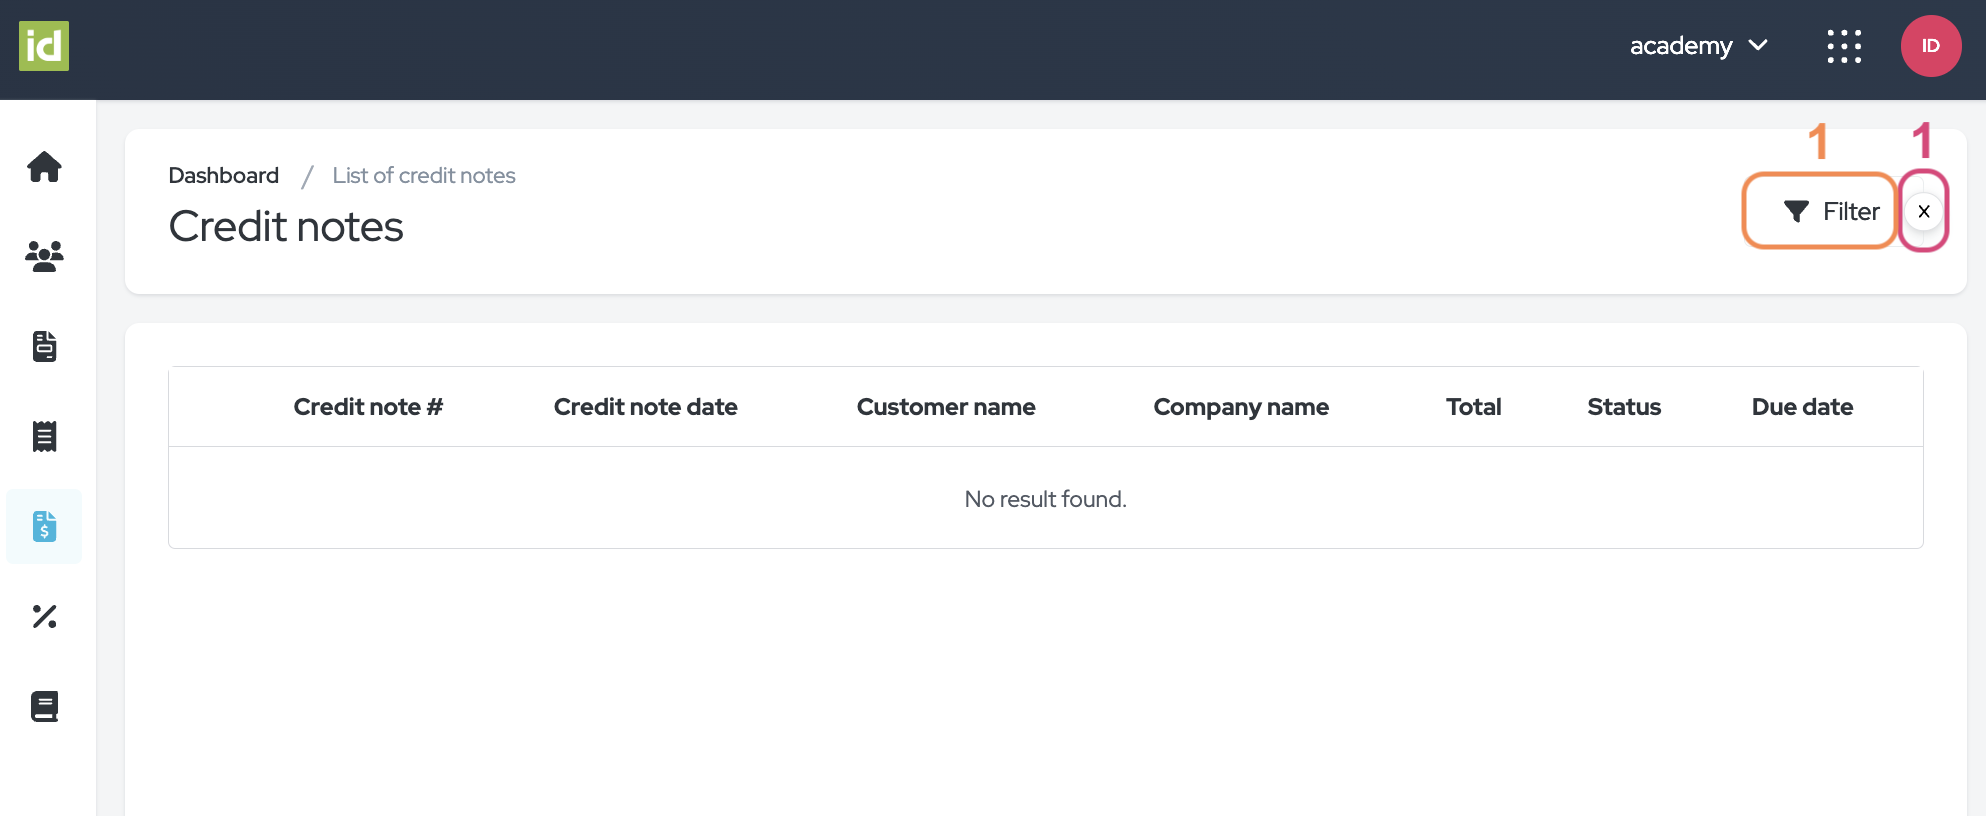
- Click on the cross next to the “Filter” button.
OR
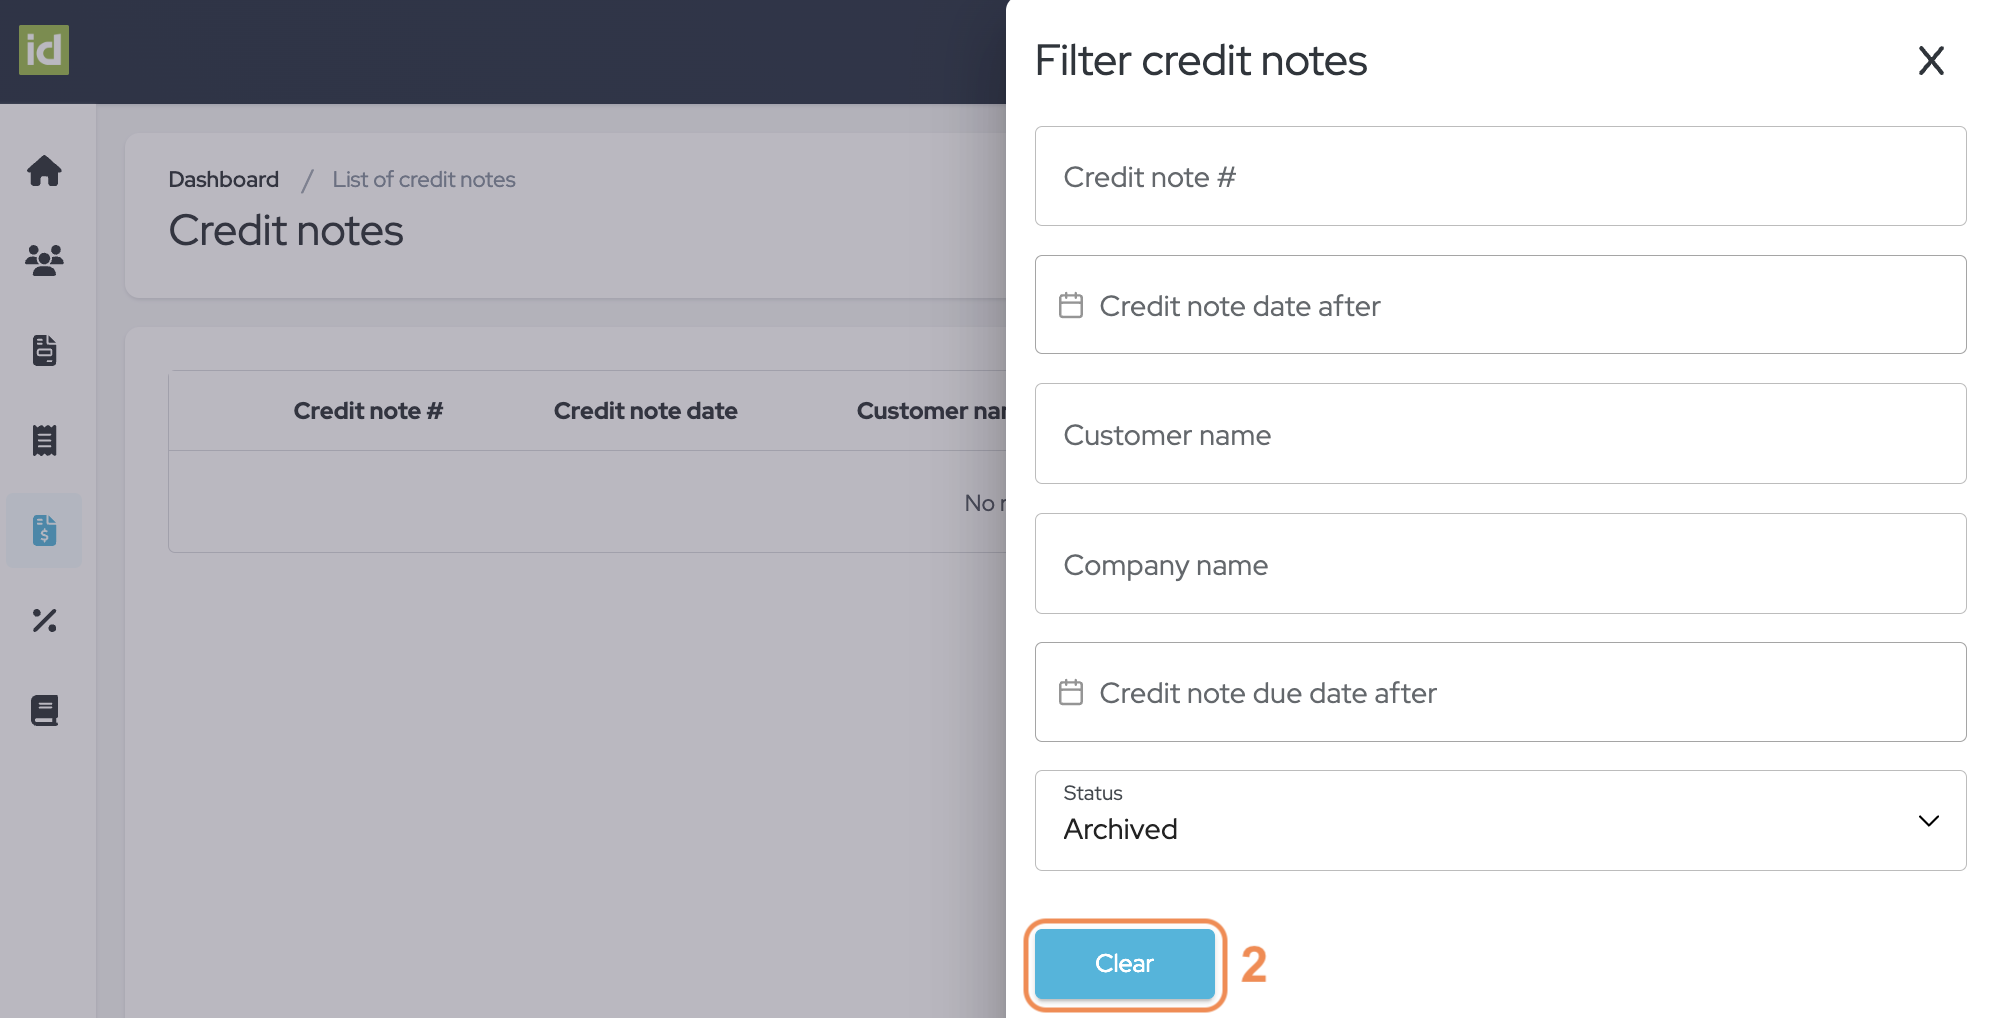
- Click on the “Filter” button.
- Click on the “Clear” button to clear your filters and to display the complete list of Credit notes.
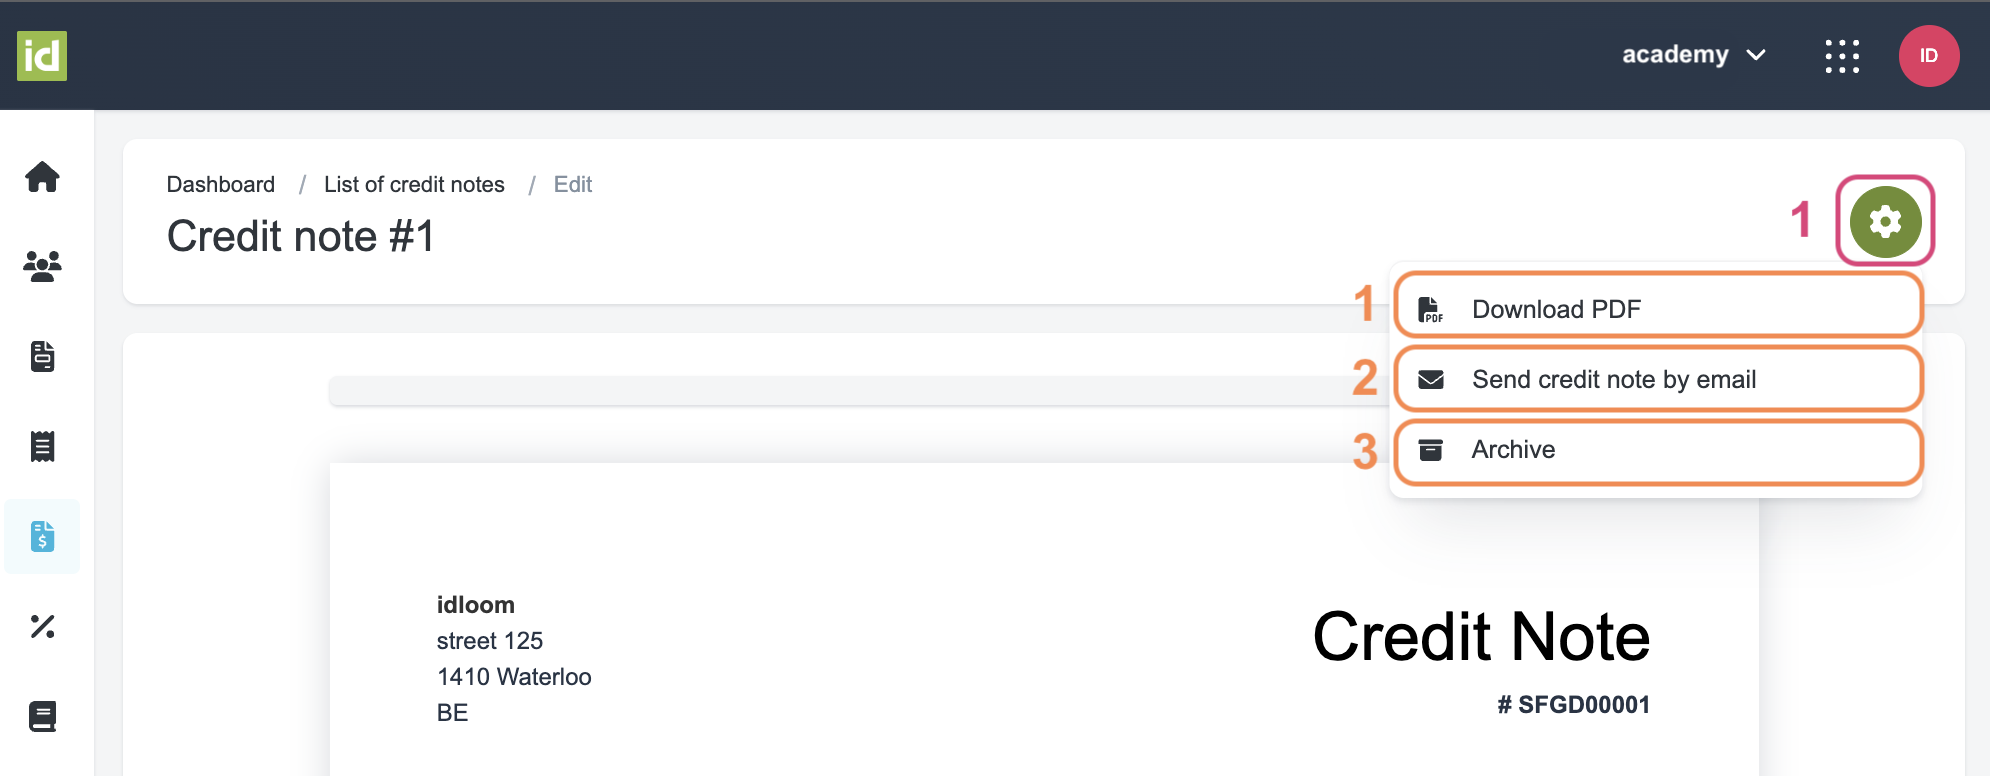
Details of a Credit note
Click on the name of the document to view its details.
- Click on the “More action” button to:
- Download the documents as a PDF
- Send the credit note by email to the Customer
- Archive the document (do not forget to click on the red checkmark to confirm).
Note: you can click on the Customer’s name to be redirected to the Customer details section.
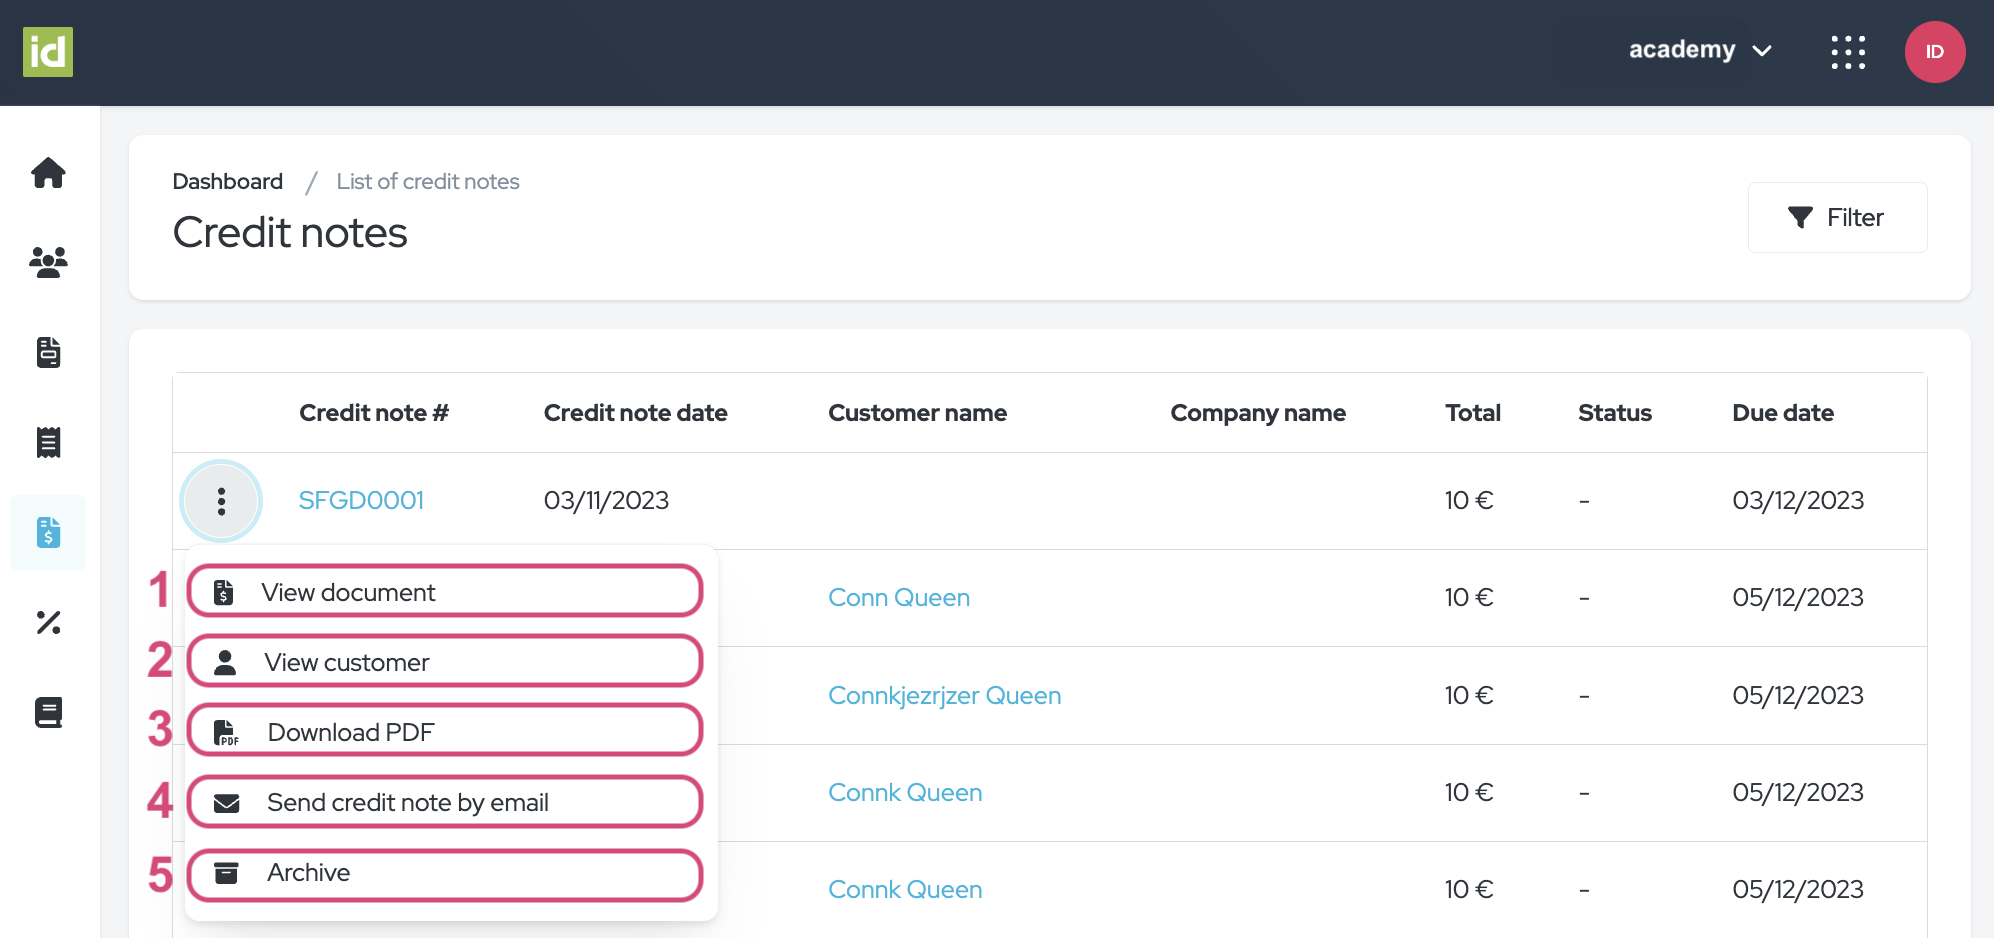
Three-dots menu actions
Navigate to the Invoice Module > Credit notes section.
- View the document details.
- View the Customer details.
- Download the document as a PDF.
- Send Credit note per email to the Customer.
- Archive/Restore depending on the current status of the document.
Please note that if your document has been archived, you have the option to permanently delete it.
Credit notes section - Events Module
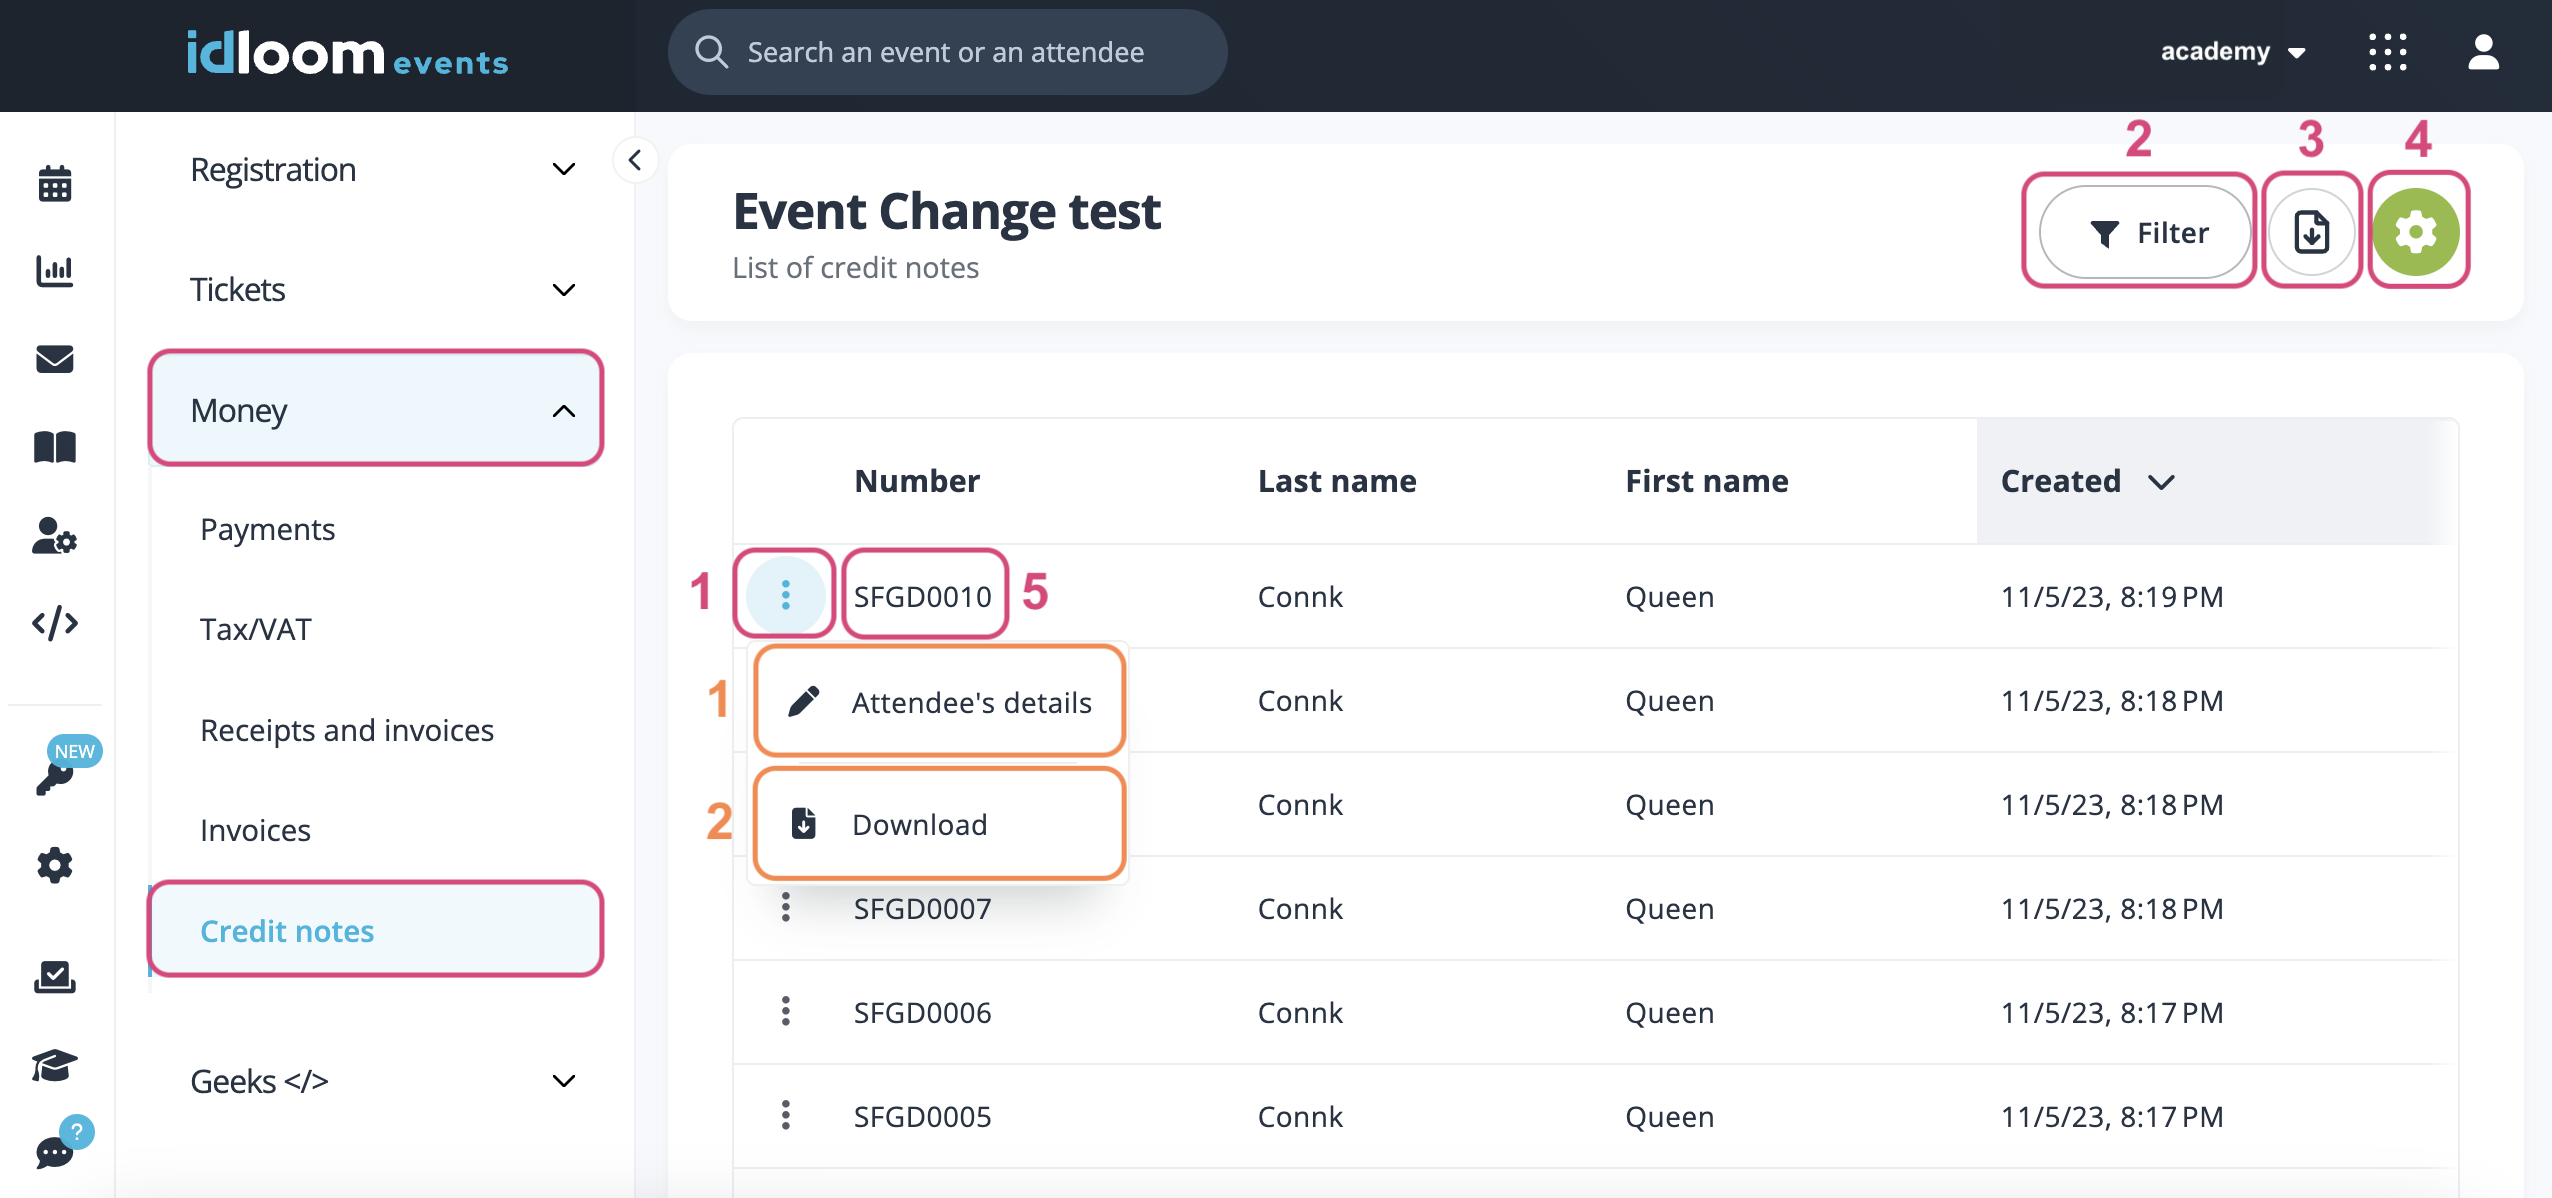
Navigate to the Events Module > Money > Credit notes section.
You will have the following actions for you to take on this page:
- Click on the three-dots menu to:
- Download the document
- Get to the Attendee’s detail page for more actions
- Click on the “Filter” button to filter your overview.
- Click on the “Export” button, to export in an Excel or CSV file, details of the invoices that have been issued.
- Click on the “More action” button, to export all the financial documents of this section.
- Click on the name of the financial document to view it.
May the new financial documents section bring you plenty of joy and satisfaction!
Discover related user guides. You might also be interested in…
The idloom.events team

