Time Crosstable View
How it helps:
As an event organizer, you definitely want to make the booking experience as simple as possible in order to maximize guest attendance. Adapting the way you display information can be key towards reaching that goal.
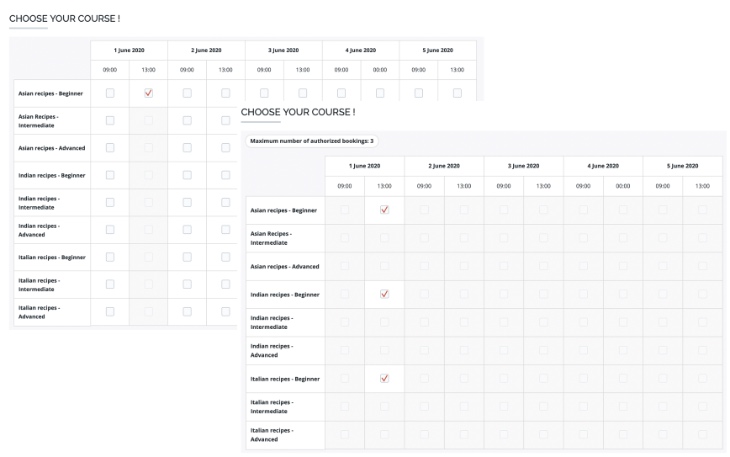
Imagine you’re organizing multiple lessons, webinars or workshops, each available many times within a certain time frame (a day, week, month, etc.). In the below left-hand screenshot, we are doing just that: a guest can choose between 9 different cooking lessons and, for each of them, there are 10 different recurrences spread over the course of a week. In other words, a guest must make attendance choices between a staggering total of 90 sessions, which is no easy feat. Presenting this information as a list view is therefore not ideal, because guests will have a hard time seeing the big picture and making comparative choices.
To address this need, you can now present your event sessions via the time crosstable view feature, which will in other words display them as a calendar/grid view, as shown on the right-hand screenshot.

How it works:
- In your backend, go to the event editing page
- Under “Registration Step 2: Event Categories & Options”, check the “Multi-sessions” box.
- Scroll down, within that same Step, to “Additional settings” and check the “Time crosstable view” box.
- With both of the above checkboxes active, create your groups and options.
Tips:
- Your groups will always be the title/purpose of the booking (the name of the cooking lessons in this instance).
- Your options on the other hand, will always be your timeslots. So, for each option, be sure to specify the date(s) and hour(s).
- You can use the “Option table generation” to avoid a lot of manual work
Option Table Generation
In our cooking lesson example, our 9 groups (lesson names) will each need to be linked to our 10 options (timeslots), meaning that we need to have a total list of 90 options. To avoid having to manually encode the 80 missing options and attributing them each to their respective group, you can make use of the “Create options table” function, which finds itself at the bottom of your groups (next to the “+ add a group” button).
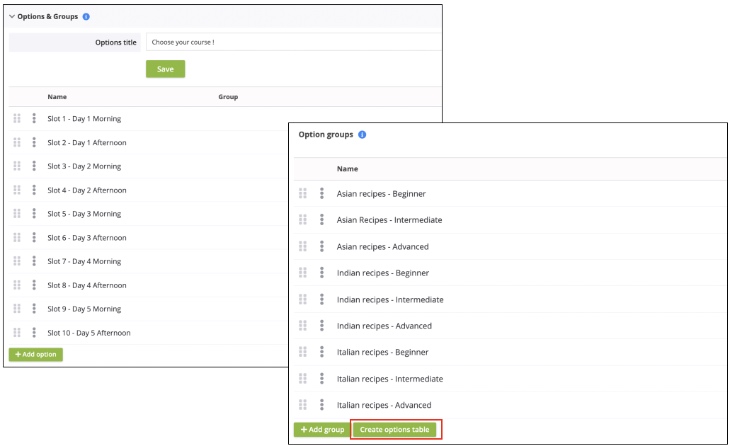
After having clicked on that feature you will notice that each group, such as “Asian Recipes – Beginner”, now finds itself attributed to each available option.
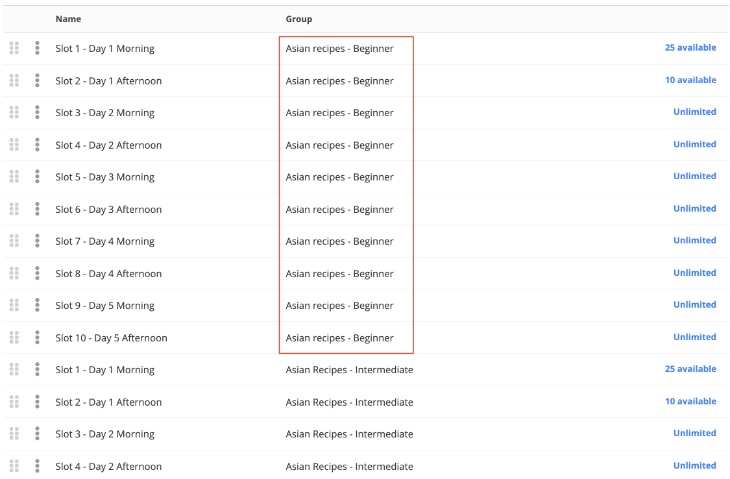
You can now modulate each option's parameters (quantities, prices, locations, etc.).
Additional features
You can also make use of two additional settings linked to the “time crosstable view” checkbox.
- "Maximum number of authorized timeslots": allows you to limit the number of bookings made during a registration as seen (cfr. Right side of below image - limit is set at 3).

- Overlapping slots:
o "Allow": You allow registrants to book overlapping slots
o "Warn": You allow registrants to book overlapping slots but warn them with a popup message if an overlap is selected.
o "Prevent": You don’t allow registrants to book overlapping slots. Once a timeslot has been selected, it is no longer available (cfr. Left side side of below image).