
How to set up your event’s ticket structure
When creating and editing your event, section “STEP 2: EVENT CATEGORIES AND OPTIONS” allows you to create and edit categories and options for your event. These represent the structure of the tickets you will be selling/making available to registrants.
This article will guide you step by step in the setup of your event’s categories, option groups, and options.
Categories
One of the most important steps of your registration form’s set up (after the initial “Step 1: Guest information”) is the creation of participation categories. Categories are the first layer of choices you make available to registrants. They are mutually exclusive (guests can only pick one) and represent the highest items in your ticketing structure. Options created later in the process will be applicable to your selection of categories, as we’ll cover later in this article.
If your event is simple and you don’t offer many choices to registrants, you can create simple categories i.e. “Participation to day 1”, “Participation to day 2”, etc. But very often event organizers wish to offer more choices for participants and filter them by type, price, etc. and spread these choices over multiple layers. This is where idloom-events unique categories/options structure becomes most valuable, allowing you to create multiple layers of choices.
A common example of categories are membership types – “Member” – “Non-member” – as shown in the example below.
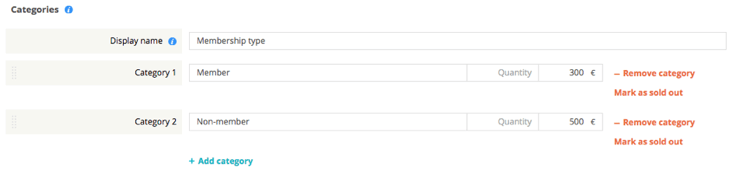
Multiple features can be set up here. You can choose to activate early bird pricing for categories (set up a different price until a pre-defined date), and/or to activate the “Ticketing” feature allowing you to sell multiple “tickets” of each category. You can also set up available quantities and pricing for each category. We voluntarily kept this example simple, and only chose to apply a different price.
Option groups
Once your categories are properly set up, you can start (if your event structure requires it) to create “Option groups”. Groups represent the structure in which the options, your registration form’s second layer of choices, will be displayed.
To continue with our example, we created two option groups: “Attendance day 1” and “Attendance day 2”. In these two groups, we will now add options applying to these two days.

Note that you can be very creative in your groups, and truly adapt the structure to your events’ specificities.
In addition, you can decide if you want guests to be able to select one or more options within each group, simply by checking or unchecking the “Single choice” button.
Options
Once your categories and option groups set up, you can begin creating your event’s options. Options are the lowest level of choices your registrants will be able to select during their registration. You can create as many options as desired, apply them to all or a selection of Categories (Members – Non-members), and choose in which Option group each option will be displayed/listed.
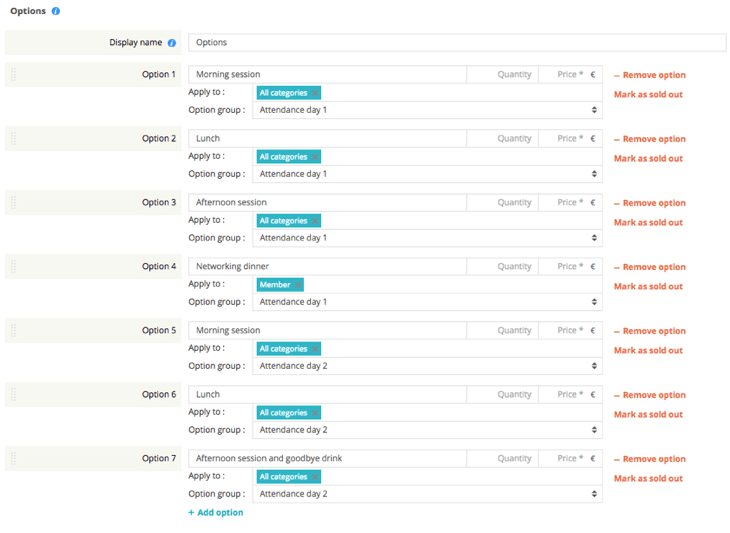
In our example, we have created options by splitting up each day’s (Day 1, Day 2 – our option groups) program by morning session, lunch, afternoon session, etc.
We have chosen to apply those options to all categories except for the Networking dinner, which is made available only to Members (Category 1). In the “Option group” field, we have selected for each individual option in which group it should appear (Day 1 or Day 2).
The end result
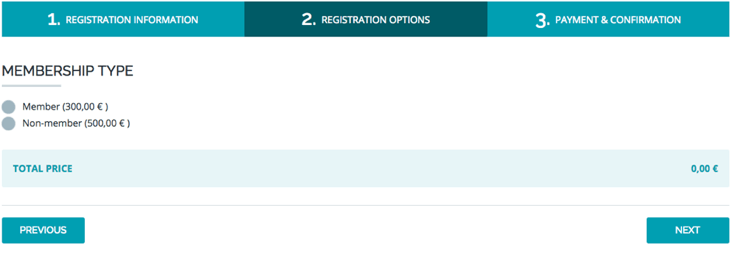
Now that we have set up our event’s categories, option groups, and options, let’s have a look at what the registrant actually sees when registering.
First, he/she will have to select his/her membership type (=Categories), as shown in the screenshot below.
Once he/she selects a category, the option groups containing the options that are available to the category chosen will appear. In our example, we chose “Member”, giving us access to all created options (note that had we chosen “Non-member”, the option “Networking dinner” of the group “Attendance Day 1” would not have been displayed/available).

After selecting all desired/available options, the registrant can simply click on next to continue his/her registration process and confirm the registration.
Tip: it is very important that you carefully create and set up your categories and options. There are limitless combinations possible, and finding the one most appropriate to your event’s specificities will greatly improve the efficiency of your event management overall. Also, you should be aware that once a registrant has chosen/purchased a specific category or option, you will no longer be able to remove that item, as you wouldn’t want to delete a ticket that’s already been purchased.
If you have any doubts about the appropriate structure for your event, or concerns about how the system can be twisted and adapted to your specific requirements, don’t hesitate to reach out to idloom’s support team!
Good luck with your future events!
The Support Team